Disclosure: This post may contain affiliate links. I earn a small commission of product sales to keep this website going.
The X-T3 has been hailed as the most popular camera of 2018, and for good reason. This highly successful successor to the X-T2 has several amazing new features, and it shares most of them with its little brother, the X-T30.
We’ll take a quick look at what’s new in the X-T3 and X-T30, and then take a closer look at Color Chrome Effect and Dynamic Range Priority settings.
Related:
Differences of the X-T3 vs X-T2
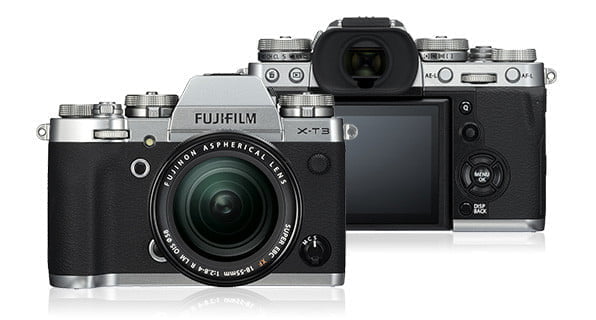
The X-T3 looks the same as the X-T2 on the outside, and it mostly is.
It has a slightly larger hand grip and is only three-tenths of an inch deeper than the X-T2. The X-T3 weighs just 1.1 ounces more than the X-T2, a negligible amount even for weight-obsessed people like me.
The X-T3 has a three-way touchscreen LCD where the X-T2’s LCD rotated on two axes and didn’t have touch.
But most of the differences are on the inside:
- An improved 26.4MP backside-illuminated sensor with a base ISO lowered to 160.
- New X-Processor 4 improves speed and focus.
- 425-point hybrid autofocus system now covers the entire sensor, with improved face & eye detection.
- Much better low-light autofocus capability (down to -3EV for the numbers nerds; the X-T2 could only focus down to -1EV).
- The electronic viewfinder now has a resolution of 3.69 million dots, versus the 2.36 million dots of the X-T2.
- Connectivity options now include a high-speed USB-C port and Bluetooth, in addition to the older power-hungry WiFi.
- The cinematic ETERNA film simulation first found in the X-H1.
- Speaking of cinema, videographers can shoot Ultra HD 4K at 30fps up to 200Mbps, with a wide F-Log curve and 10-bit output.
X-T3 and X-T30 differences

Now here’s a brief comparison of the X-T3 and the X-T30.
The X-T30 is smaller and lighter than the X-T3. The X-T3 weighs 1.19 pounds where the X-T30 only weighs 0.84 pounds. The X-T3 also occupies a space of 44.4 cubic inches while the X-T30 is only 27 cubic inches.
The X-T30 is also not weather-sealed, a dealbreaker for many adventurous photographers. It also has a smaller electronic viewfinder than the X-T3.
Other differences between the X-T3 and X-T30 are that the smaller camera only has one SD card slot, a slower UHS-1 slot, whereas the X-T3 has two, one of which is the faster UHS-II.
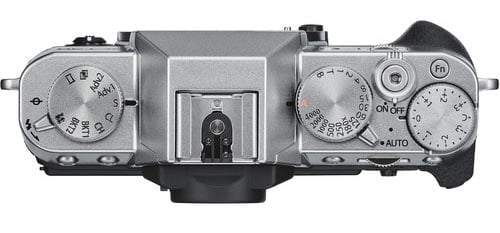
The X-T3 doesn’t have a popup fill flash built-in, but the X-T30 has a cleverly disguised popup flash in the EVF housing. Another physical difference on the exterior is that where the X-T3 has a dedicated ISO dial, the X-T30 has a drive mode dial.
Those are just the highlights; you can read a full comparison of the X-T3 vs X-T30 in this post.
Highlighted features of the X-T3 and X-T30
I recently rented an X-T30 to see what a specific few features were all about. Were these features enough to make me want to upgrade my trusty X-T2 to an X-T3?
- New backside-illuminated sensor
- Color Chrome Effect
- Dynamic Range Priority
Why do numbers 2-3 really matter? Aren’t they all things that I can just take care of in post-processing with the RAW file?
Yep, they sure are. But I’ve been on a quest to drastically reduce the amount of post-processing I do, and these in-camera features get me even closer to that goal.
This is not intended to be a comprehensive review of these features. It is rather more of an aid to making an upgrade decision.
Backside-illuminated sensor
A backside-illuminated sensor is technology that made Sony’s Exmor R such a capable sensor in their Alpha full-frame mirrorless cameras. Fujifilm is now the first company to feature this technology in an APS-C camera, in their X-T3 and X-T30.
I’ll just attempt to non-technically paraphrase what a BSI sensor is; if you want to learn more you can check this out from the Adorama Learning Center.
In a back-illuminated sensor, the layers of the sensor are arranged differently. The light coming through the lens doesn’t have to pass through as many layers and hits the photoreceptors earlier, thus making them more sensitive to light. This also improves focus performance in low light.
BSI sensors have their own problems which I won’t go into here.
I’ll just say, don’t be discouraged by what you read in the forums when people review the X-T3/X-T30 sensor. It’s a very good sensor and captures more detail at high ISO. It handles color very well.
As for the noise, it’s not really noticeable unless you’re viewing the photo at 100% and searching for defects – and who really looks at a photo that way?
For all of my pixel-peeper friends, here’s an untouched X-T30 RAW at ISO12800 and 100%, followed by a camera JPG at Noise Reduction -4. I don’t know why people are trashing this sensor – 12800 never would have looked this good on an APS-C sensor a few years ago.


What, I like beer.
Color Chrome Effect
Update: after spending some time with this setting, and on newer cameras, I’ve dedicated an entire post to Color Chrome Effect and Color Chrome FX Blue.
One of my biggest reservations about lightening the shadows through the Shadow Tone in-camera setting was what happened to the colors. They could just be…ugly and unnatural at Shadow -2. Muddy. The colors were flat-toned and all sense of depth disappeared.
Color Chrome Effect is a setting first found in Fujifilm’s expensive medium-format cameras. It’s a setting that helps deepen the color in shadows.
After playing around with this setting, it certainly addresses this complaint, but not globally. It increases the contrast and saturation in some colors in the shadows, but not others. Almost like decreasing the luma values of specific colors. It’s subtle, but just enough subtlety to make it pop without being overbearing.
Color Chrome Effect works differently with different film simulations and different exposures. It’s something that I, and you, will have to play around with to figure out which custom settings you want to program with Color Chrome Effect, if at all. Maybe you just want to save it for after you take the photo, adding it later with the Q button to see if it compliments the photo.
The animation below shows the difference between Off and Strong. This is still that ISO12800 camera JPG, using Provia simulation.

Dynamic Range Priority
There were a few options for increasing dynamic range in high-contrast scenes in the older models.
You could set the Highlight and Shadow tones manually to decrease highlights and boost shadows.
You could also utilize the Dynamic Range setting, which used a bit of magic to preserve highlights if you exposed for shadows. It wasn’t perfect; it worked well in some situations and didn’t in others.
Dynamic Range Priority was introduced in the X-H1 and is now in the X-T series. It combines D-Rng, Highlight, and Shadow tones settings into one. You can turn it off, set it to Weak for moderate compensation, Strong for extra compensation, and Auto.
Read this post to learn more about the difference between the standard Dynamic Range setting and the new Dynamic Range Priority setting.
D-Rng, Highlight Tone, and Shadow Tone will be disabled when you’re using Dynamic Range Priority since this setting adjusts all three of those.
Auto seemed to work pretty well. There were some continuous shots where it chose Weak for the first frame and Strong for the second, so some inconsistencies there, but it was in a tough situation.
I found the “Weak” setting to look much more natural than I expected. You could tell that some processing had been applied but it still looked pleasing. “Strong” seems to be too strong most of the time. The image looks too flat and HDR-ish. It’s less obvious when you use a high-contrast simulation like Velvia or Pro Neg Hi, knock the Color down to reduce overall saturation, and set Color Chrome Strong to reintroduce some slight contrast in the shadows.


Like D-Rng, Dynamic Range Priority requires higher ISO for higher settings (because it works on the same concept). Strong requires at least ISO640 and Weak requires ISO320. If you shoot in AUTO ISO the X-T30 automatically bumps up the ISO to 640 when it needs the Strong setting. Noise was unnoticeable when shooting outdoors and the ISO increased to 640 to get a strong dynamic range adjustment.
You can “redo/lower” the Dynamic Range Priority settings with the Q button after taking the photo as long as the original photo was taken at a higher setting – so you can only go from Weak to Off or Strong to Weak to Off.
Final thoughts on my initial X-T30 review of new features
As I mentioned at the beginning, this wasn’t intended to be a comprehensive review of these new features or the X-T30 as a whole. I just wanted to take it for a test drive.
The X-Trans IV sensor is better than the X-Trans III found in the X-T2, even if just slightly. No one really views photos at 100% in real life, so the slight increase in noise at high ISOs, as a byproduct of BSI technology, doesn’t matter and Fuji does a great job of handling it.
Color Chrome Effect is a nice little touch and will help out my JPGs when I don’t want to process a RAW file.
I’m not completely sold on Dynamic Range Priority though. There are certainly applications where I would want to use Weak, but I don’t see myself ever using Strong except in the most specific of circumstances. I’ll have to spend more time with it.
I’ll upgrade, but I’m in no rush. I still love my X-T2.
But I do have my eye on the X-T30 to replace my secondary camera body. If you don’t absolutely need weather-sealing, there’s not much reason to select the X-T3 over the X-T30. Save that money for a new lens.