Disclosure: This post may contain affiliate links. I earn a small commission of product sales to keep this website going.
What’s the best workflow to combine Photo Mechanic and Capture One?
Photo Mechanic is hands-down the most efficient photo editor available. The problem is, that it’s not a photo processor.
And Capture One, at least in my opinion, is one of the best photo processors on the market today. But like most other photo processing programs, it lacks the digital asset management capability of Photo Mechanic/Photo Mechanic Plus.
Here’s a simple workflow that I use to combine the strengths of both Photo Mechanic and Capture One.
- Do all editing in Photo Mechanic first
- Process selected RAW photos in Capture One
- Export for publishing
We’ll explore these steps in more detail and cover some setup requirements in this article.
Accompanying podcast episode:
Why use two programs?
Some photography suites – Lightroom Classic comes to mind – try to do everything. And for many photographers, as evidenced by the professionals who use it, it’s enough!
Objectively, however, Photo Mechanic is a better editor. It’s just fast and allows for much more efficient organization, photo culling, and metadata entry – especially when using the Plus version which includes a Catalog database similar to Lightroom.
You could use Photo Mechanic for years without even scratching the surface of all its capabilities. My Photo Mechanic Guide covers all of these features in video lessons if you’re interested in further exploring it.
And then Capture One has always been my favorite RAW processor, mostly due to its RAW demosaicing, precision color, and overall feel of the processed photos. But, as far as editing, it’s nowhere near in the same league as Photo Mechanic.
I always advocate for simplicity, but I also advocate for efficiency. And using a workflow with Photo Mechanic and Capture One (or Lightroom, for that matter), despite being two separate programs, is actually faster and easier than trying to do it all in one program.
Preparation
You want all of your hard work in Photo Mechanic to carry over to Capture One and all the way through publishing. This requires some initial setup in both Photo Mechanic and Capture One.
Photo Mechanic setup
You’ll need to open up the Preferences dialog (Ctrl+, for a PC, Cmd+, for a Mac) and check a few things.
Both Photo Mechanic and Capture One use the industry standard XMP sidecar files for metadata, including ratings, color tags, keywords, captions, etc. They won’t automatically sync, however, unless set up properly.
In IPTC/XMP:
- Uncheck Add embedded IPTC (XMP will always be written)
- Uncheck Allow RAW files to be modified
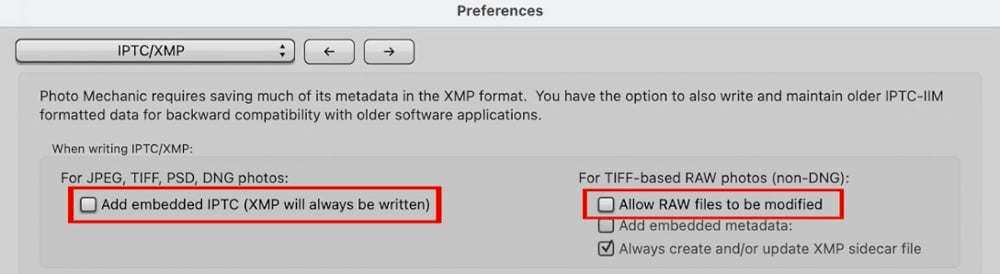
This ensures that the XMP files are always created and used by Photo Mechanic.
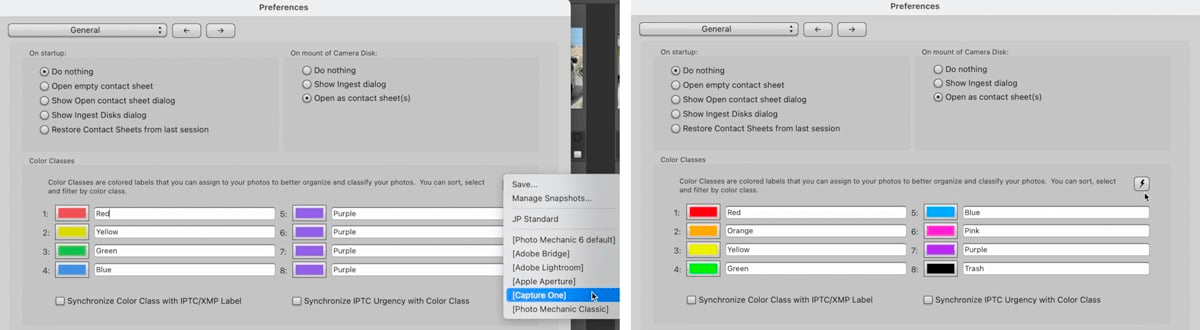
In General, open up the Snapshot for Color Classes and select Capture One if you want the two to sync. They will have different meanings between the two programs otherwise, which may be fine if you don’t use them.
In Launching, tell Photo Mechanic to use Capture One as the default editor. You can assign different programs for different file extensions if you wish, otherwise just browse to your Capture One application and set that as the default. Also make sure that if you’re using the RAW+JPEG mode, you’re opening the RAW files in Capture One.

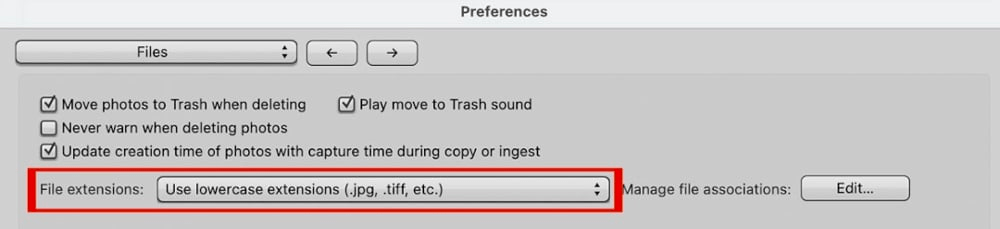
And finally – and this is especially important if you use network storage – you may need to go to Files and check your extension. For the longest time I couldn’t figure out why my metadata wasn’t syncing; Capture One was looking for .xmp files but Photo Mechanic was saving .XMP. My storage system was case-sensitive. All was good after changing Photo Mechanic to Use lowercase…
Capture One setup
You’ll need to tell Capture One to look for the XMP files and what to do with them.
In Preferences > Image, go down to the Metadata section.
- Check Prefer Embedded XMP over Embedded IPTC
- Check Prefer Sidecar XMP over Embedded Metadata
You have a few options for the Auto Sync Sidecar XMP pulldown:
- None won’t do anything automatically; you will be responsible for manually syncing the metadata at some point (Image > Load Metadata). Otherwise, your processed images will not have any of Photo Mechanic’s metadata with them.
- Load will automatically load the metadata you saved in Photo Mechanic when the images are imported into Capture One. This is my preference.
- Full Sync will do the same as load; it will also automatically write any metadata changes you make in Capture One to the sidecar metadata files so those changes are read by Photo Mechanic later.

At the end of all of this, test your setup. Make some metadata changes to one photo in Photo Mechanic, like some keywords and captions. Open it in Capture One. Ensure the metadata is properly showing in Capture One.
Starting in Photo Mechanic
We’ve set up Photo Mechanic and Capture One to work with one another, now what?!
Editing
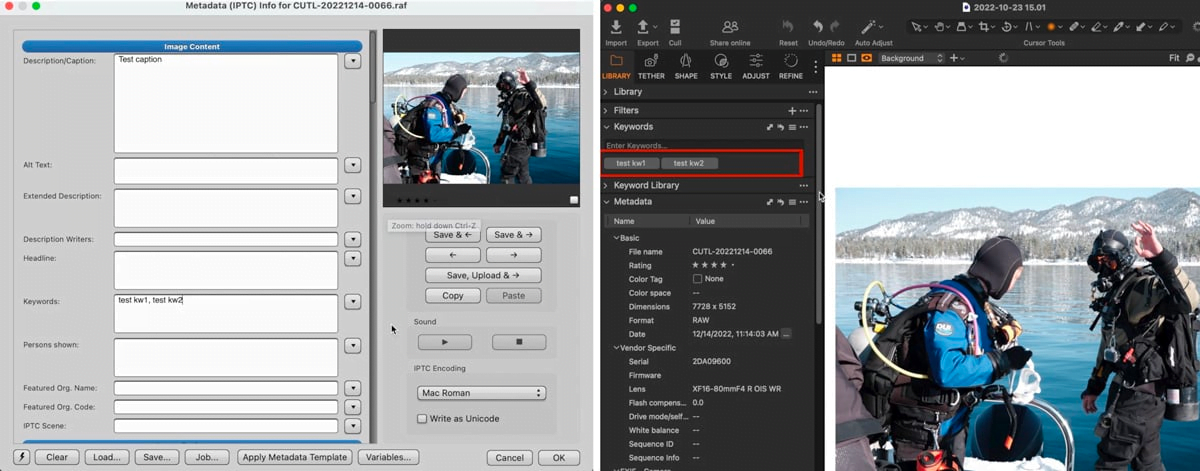
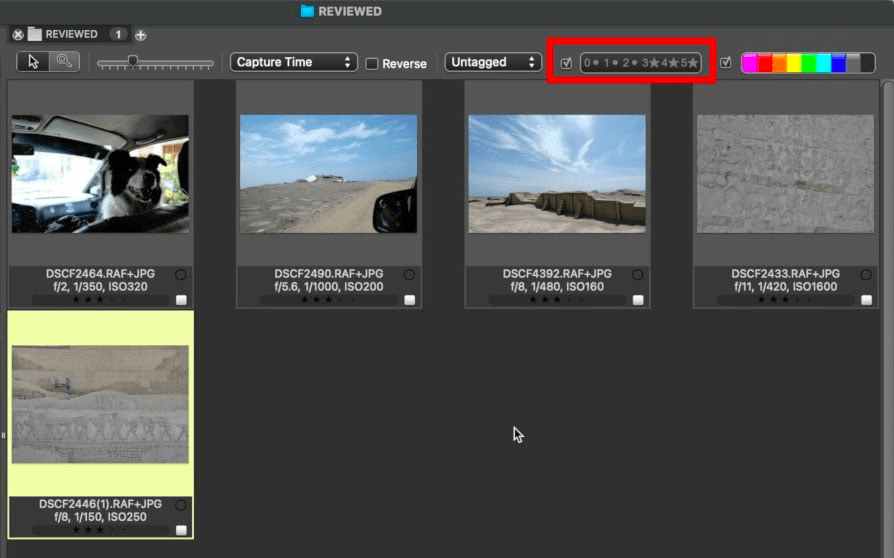
I try to do as much as possible with the original files in Photo Mechanic first. This means I do all of my file renaming & metadata editing before external processing, including adding geolocation data if applicable.
I see this metadata as a vital piece of the original files, not the processed files, and it does streamline everything. Check those linked articles, as well as this one on Structured Keywords, for more on that.
Then I’ll do all of my editing/culling and refine my initial batch of photos down to a final selection of photos that I want to process. This may be refining 100 down to 10, for example. I don’t want to open or process all 100 in Capture One. I usually also add some refined metadata like more specific captions & keywords to my final selection.
Moving files
This step is optional, but it helps my organization.
I’ll put my “selected” photos into a “SELECTS” subfolder inside the main image folder.
You can do this in Photo Mechanic Plus using Photo Mechanic’s built-in file navigator so long as those photos aren’t already imported into Lightroom Classic or Capture One already (this will break the database link).
Processing in Capture One
Once you’ve identified all of the photos you want to process and added all of your metadata in Photo Mechanic, it’s time to do the processing in Capture One!
- Open up Capture One and the Catalog you want to use (the proper Catalog needs to be open first).
- In Photo Mechanic, select the photos you want to send to Capture One.
- Go to Image > Edit Photos or use the hotkey combo Ctrl (PC) or Cmd (Mac) + E. Select “Yes” if you’re prompted to edit all photos.

Capture One’s Import dialog will open. You can Pick All photos and Import them into your Capture One catalog. Make sure you don’t have any Naming instructions in the Capture One import dialog if you’ve already named them in Photo Mechanic.
The nice thing about this method is that you’re only opening the photos you want to process, not all photos from the shoot, which can really bog down Capture One.
Process all of your RAW files as desired and get ready to Export!
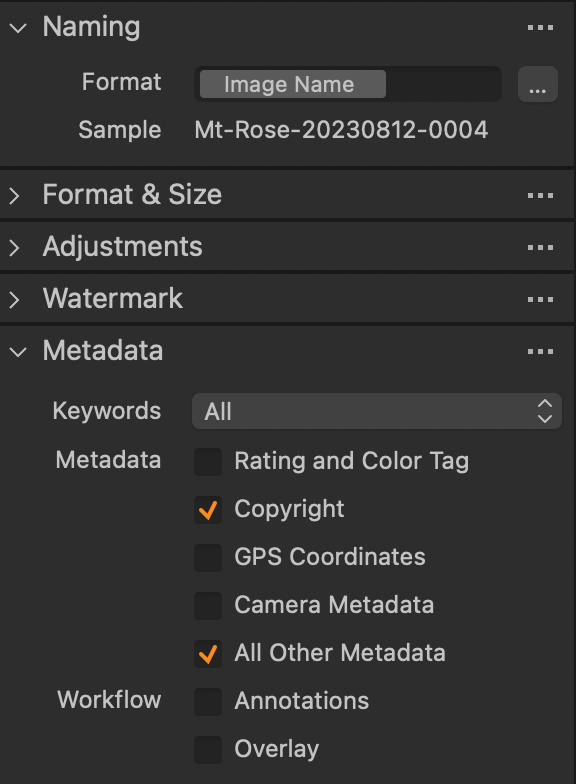
Exporting from Capture One
Set your Export options as desired, to include the file dimensions, sharpening, etc.
As far as the destination Folder is concerned, I put everything in a subfolder named, “PROCESSED”. This keeps my processed JPGs/TIFs separate from all of my RAW files.
Set “Naming” to “Image Name” so the original file name is retained.
Then in the “Metadata” section, make sure you’re saving the metadata you want to save – which could be everything, or just your Copyright notice.
Finishing in Photo Mechanic Plus
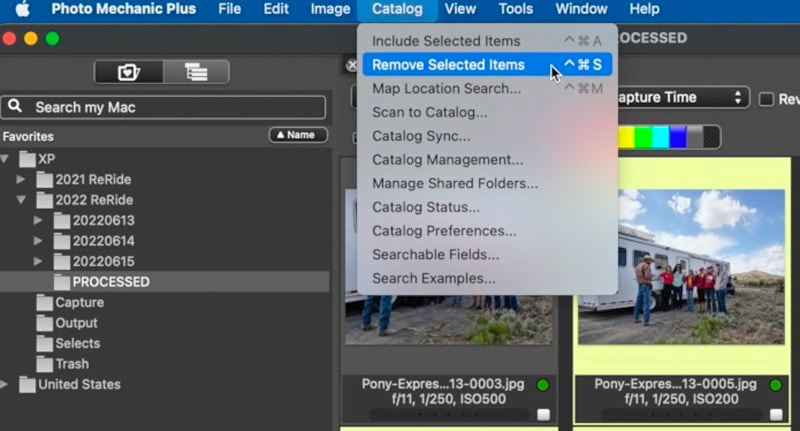
There is one more optional step in a Capture One and Photo Mechanic Plus workflow – which won’t apply if you’re not using the Plus version of Photo Mechanic. You can add those processed files back into your Photo Mechanic Plus catalog.
You may not want to do this because the duplicates can be confusing (multipe files with different extensions). You can just use Photo Mechanic’s file navigator to go to those photos if you need to. But if you want to have them in the Catalog so they’re easier to find, go to that folder, select all photos, right-click, and choose Include items in Catalog. The Catalog menu has a similar option, Include Selected Items (Remove shown in the example below).
Conclusion
It may seem like there are a lot of steps in this Capture One and Photo Mechanic workflow. Broken down, however, it’s really not much after the initial configuration.
- Set up Photo Mechanic preferences
- Set up Capture One preferences
Then
- Do all of your editing in Photo Mechanic
- Put all selected photos in a “SELECTS” folder
- Open those photos in Capture One from Photo Mechanic
- Process your photos in Capture One and export them into a “PROCESSED” folder
This may just be faster and better for you than trying to do it all in one program like Capture One or Lightroom Classic alone. Especially after some practice and seeing the workflow for yourself. Integrating Photo Mechanic with Capture One can give you the best of both programs.
You can check out our Photo Mechanic Guide (20% off) and/or our After the Capture course (20% off) for guided videos, worksheets, and quizzes to help you out with Photo Mechanic and editing workflows.
Please leave any questions or comments below!
Jarrett K
Saturday 10th of February 2024
Thanks for the clear write-up. I've been using Capture One and Photomechanic together for a while now, and just moved to a new computer so it was good to have all the configurations in one place. Question: are you able to sync star ratings between PM and C1 (both directions)? Keywords seem to sync without issue, but I've been unable to get star ratings to sync (although I remember having them sync at some point in the past).
John Peltier
Wednesday 14th of February 2024
So, keywords are syncing both ways but not ratings? If that's the case, I'm at a loss for what the reason could be. They're both written to the XMP file, so if one piece of metadata is updating they theoretically all should. Otherwise, be sure you follow the configuration recommendations in the article and make sure you're doing a full sync (both read/write) in Capture One.
Gareth Callan
Thursday 14th of September 2023
Thanks for this John. I understand the thinking behind it and I'm wondering whether this way of working was developed back in the days when the C1 import viewer was really slow to load (which it no longer is....well, it might take 90 seconds to preview 3000 images.....)? So my question is whether it's still as relevant.
My other question is why do don't use Sessions... and then use the file section in C1 to add processed picks into a master C1 catalogue?
Really appreciate all your work and please understand my questions are clarifying understanding, not criticism.
Gareth Callan
Wednesday 20th of September 2023
@John Peltier,
Yes... exactly my use case for Sessions. I have my files and session on an external SSD drive so I can work in different locations & computers easily.
Thank you for your thorough reply.
John Peltier
Friday 15th of September 2023
There are so many other advantages to Photo Mechanic than just rendering the images slightly faster - when you get into all the ways of using Variables, Structured Keywords, Metadata Templates, and the organization features of the Plus version of Photo Mechanic, Capture One is still nowhere close to those capabilities. But if you don't care about or use all that stuff, then Capture One alone may be enough!
Starting with Sessions and then importing into a master Catalog can make sense to photographers who don't use Photo Mechanic, like you're doing a wedding and want to start your post-production by creating a Session for the wedding, doing all of your culling, processing, exporting, then adding some of your "portfolio-worthy" photos into a master Catalog at the end of the workflow.
But creating a Session with a Photo Mechanic workflow is going to create all of those other folders and "steps," like Capture, Selects, Trash, Output. By the time we're importing into Capture One from Photo Mechanic, we're already just prior to the "Output" stage. We're not using any of those other folders and I just think they're clutter in the system. If your end goal is to import into a master Catalog, you might as well skip the Sessions step and start with the Catalog import. Unless you're worried about your Catalog getting too bloated, but since we're already only importing our Selects into the Catalog (and not all files), this isn't as much of a concern. There is of course nothing wrong with creating a Session each time...you're just going to have a lot of Sessions on your system. I'd rather just keep everything in one Catalog so that while I'm in Capture One I can bounce back and forth between photos from different folders. Personal preference :) Great question! P.S. one thing I meant to add but forgot - Sessions do have the advantage of being "portable," so you can move them around between storage devices/computers without messing with a Catalog database. If that's something you do, it may be a favorable solution.