Auto ISO in Nikon Z: How It Works and When to Use It
Disclosure: This post may contain affiliate links. I earn a small commission of product sales to keep this website going.
One of the most common reasons photos aren't sharp is shutter speeds are too slow.
Why are shutter speeds too slow? Because photographers incorrectly have it beaten into their heads they need to stay at ISO 100 to have "clean" images. This is nonsense, and you can read all about my thoughts on it here.
Years ago, I suffered from an outrageous amount of blurry photos when I was advised to keep my ISO between 100 and 200. I didn't care what my shutter speed was; I only cared about keeping my ISO low because that's what people in forums said to do. As a result, my shutter speeds were too slow, and my photos were even more unusable - because of motion blur - than they would have been because of "noise."
So, how do we solve this? How do we know which ISO to use to give us fast enough shutter speeds? How do we keep up with adjusting another exposure variable? The answer lies in using Auto ISO.
What is Auto ISO?
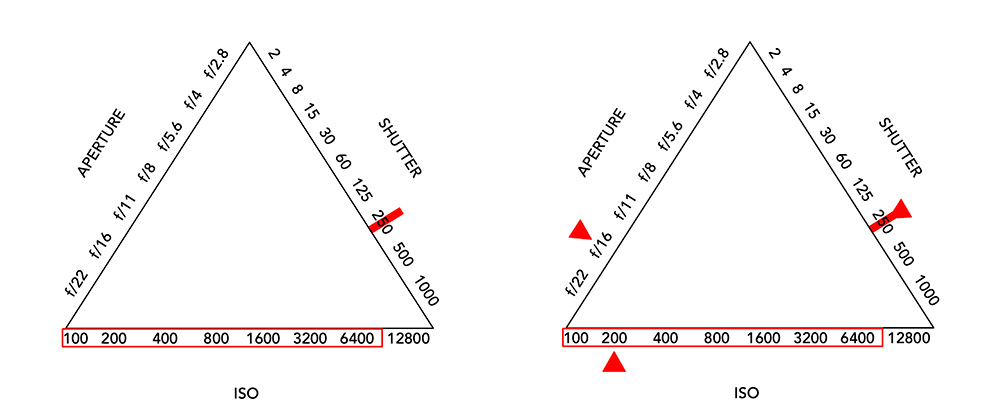
Auto ISO is what you could call a "sub-exposure mode" to supplement your other exposure modes, P, S, A, and M. When Auto ISO is enabled, the camera will choose which ISO to use to give you the exposure that you asked for.
An ISO range
The camera won't pick any ISO, though. You'll specify a range in which you allow the camera to operate. It will stay within this range.
If you tell the camera, "use a minimum ISO of 100 and a maximum of 6400," it will do its best to stay as low as possible. If the photo will be underexposed with the aperture and/or shutter speed you specified, then it will raise the ISO as necessary. Once it gets to your limit, it will stop raising the ISO.
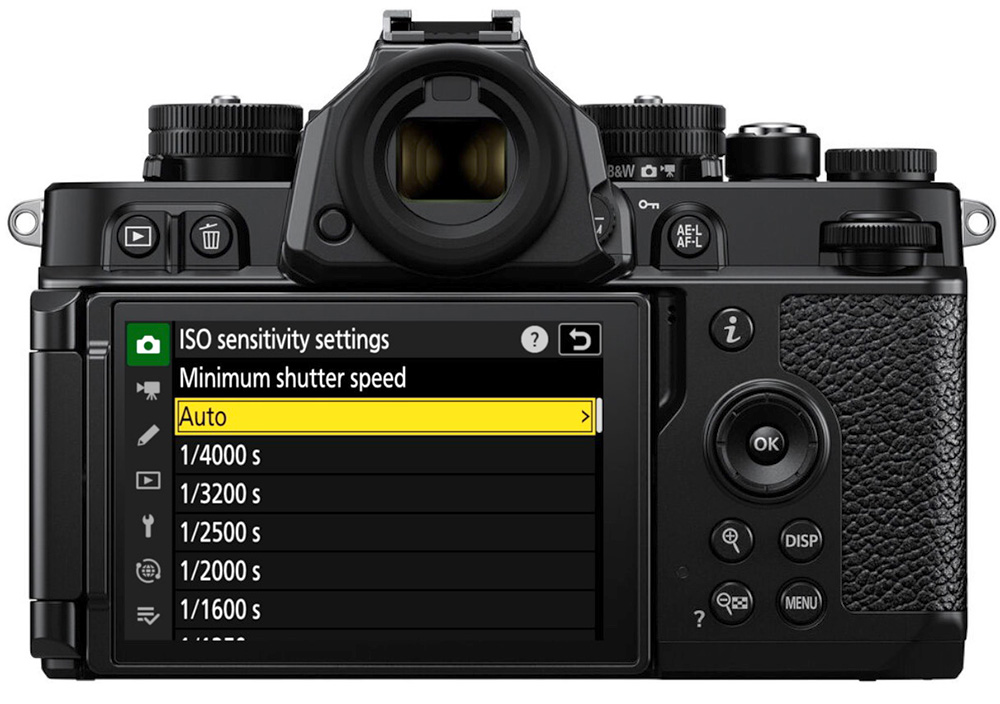
A minimum shutter speed
In addition to an ISO range, you can set a minimum shutter speed - the slowest shutter speed you want to use in exposure modes where the camera picks a shutter speed (Programmed Auto and Aperture Priority modes).
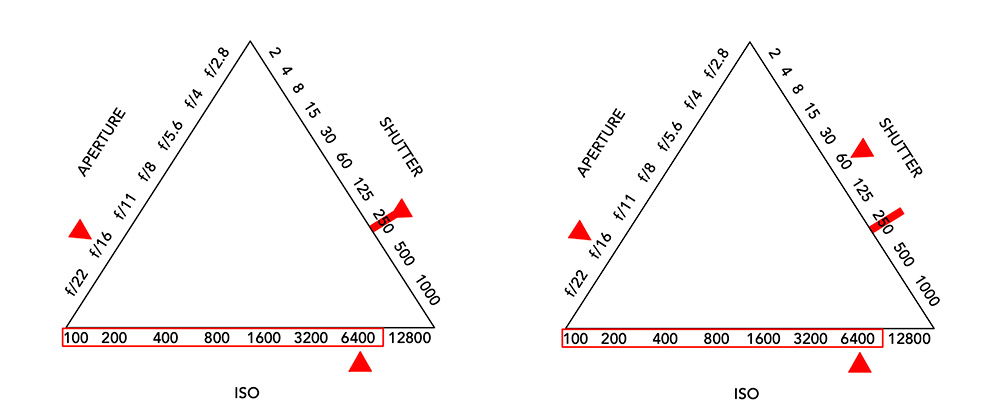
An Auto ISO example
Let's put it all together to see how it works. You set up your Auto ISO with a minimum of 100 and a maximum of 6400. You set a minimum shutter speed of 1/250 sec.
You're photographing in Aperture Priority mode with an aperture of f/16 for a deep depth of field. In the middle of a sunny day, the camera wants to set a shutter speed of 1/125 and an ISO of 100 for proper exposure. But you told the camera never to go slower than 1/250 sec. The camera will increase the shutter speed one stop to 1/250 sec, which will also require raising the ISO to 200.
Some clouds pass over the sun, reducing the ambient light. The camera will raise the ISO as needed while remaining at 1/250 sec. shutter speed.
The sun sets, and darkness sets in. The camera raises the ISO to your programmed maximum, 6400. The photo is still underexposed at 1/250 sec. and you keep your aperture at f/16. The camera won't raise the ISO past 6400 but will decrease your shutter speed slower than your set minimum to give you the requested exposure.
The camera prioritizes your ISO range. It will sacrifice minimum shutter speed if it gets to that point.
Your shutter speed will remain fixed at your set shutter speed if in Manual or Shutter Priority modes. Your photo will be underexposed if the Auto ISO can't go high enough.
If this is all gibberish, you can check out our free Exposure Triangle for Beginners course 🙂
Setting up Auto ISO in Nikon Z
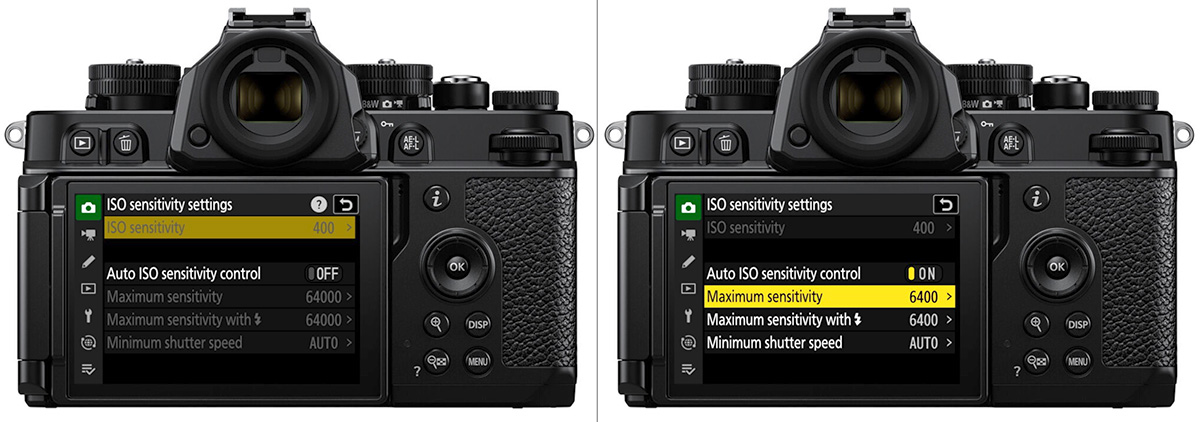
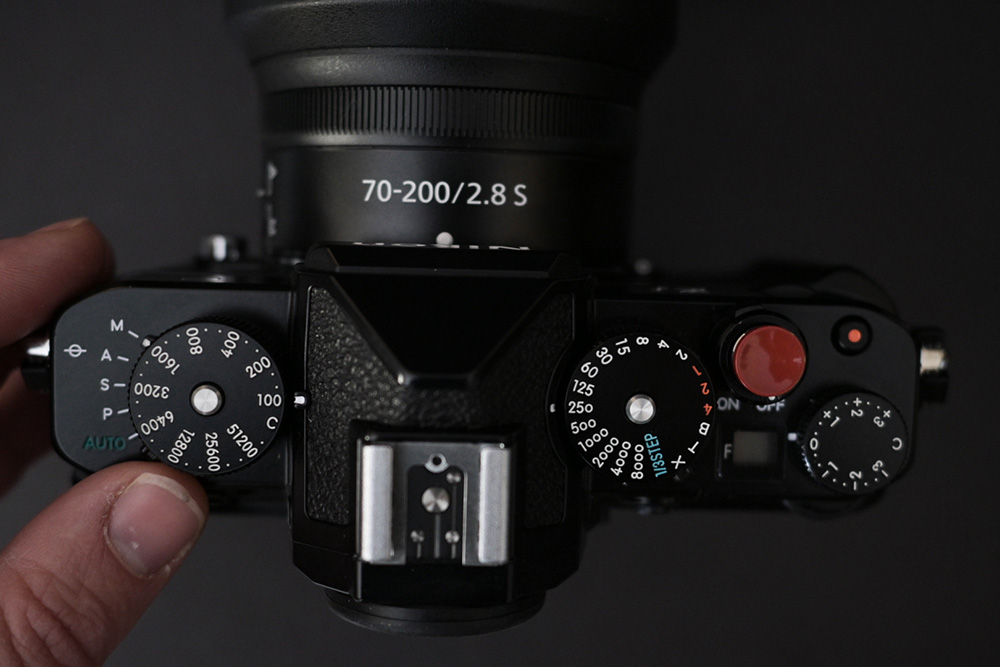
If you're coming from Fujifilm systems, you may be used to having three Auto ISO programs available. Nikon Z cameras only have one Auto ISO setting. You'll find this in the Photo Shooting Menu under ISO sensitivity settings.
- ISO sensitivity: This is your current ISO, or in the Nikon Zf/Zfc, the position of the ISO dial. When using Auto ISO, this is your minimum (default) ISO. You'll probably want this at 100.
- Auto ISO sensitivity control: Set this On or Off to use Auto ISO. If off, your ISO will be fixed at the ISO shown above.
- Maximum sensitivity: Enter this submenu to set the maximum ISO you want the camera to use in Auto ISO. You can go insanely high; for an automated program, I like to keep it at a reasonable 6400. In really low light, I'll go higher manually.
- Maximum sensitivity with flash: Same as the above except when using flash. You might be able to set this lower if using flash.
- Minimum shutter speed: Set the slowest speed you want the camera to use in Auto ISO. Remember, if the camera hits the ISO limit and the photo remains underexposed, the camera will go slower than this minimum shutter speed.
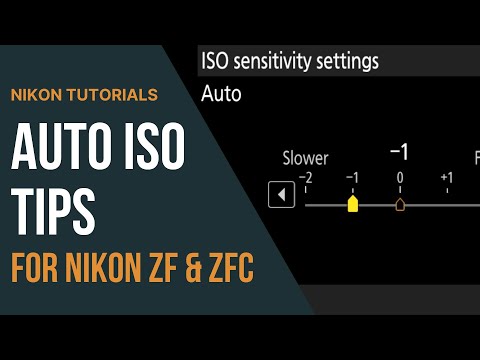
Auto Minimum Shutter Speed
You'll see an Auto setting in the Minimum shutter speed submenu.
Auto will let the camera determine the minimum shutter speed based on the focal length.
The longer the focal length - the more you're zoomed in - the more "shake" will be apparent. The camera will increase the minimum shutter speed for longer focal lengths and decrease it for shorter focal lengths, where shake is less obvious.
The camera generally follows the inverse focal length rule, meaning the minimum shutter speed will be the inverse of the focal length (1/200 sec. for a 200mm lens).
There is also a "slower" and "faster" range in this Auto submenu, from -2 to +2. These correspond to stops of shutter speed change from that inverse rule. Negative numbers will slow your shutter speed further, and positive numbers will increase your shutter speed.
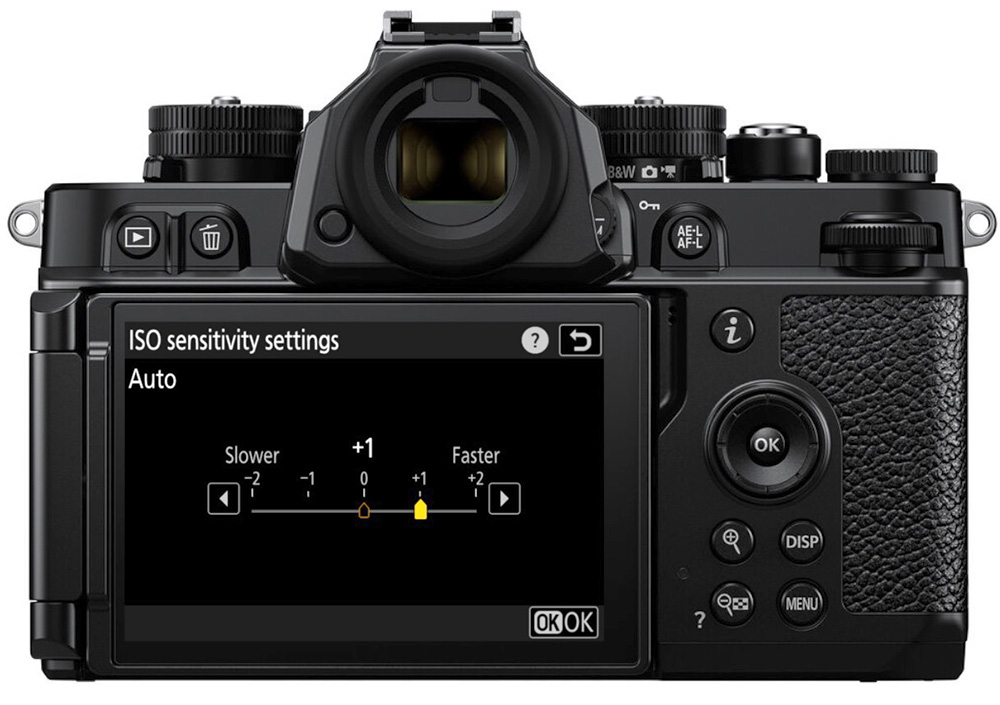
For example, with Vibration Reduction (VR) enabled and photographing still life, you may be able to go slower than 1/50th sec with a 50mm lens and still get tack-sharp photos. Setting this to Auto -2 will slow the auto shutter speed two stops so that the camera will set approximately 1/13th sec. shutter speed for a 50mm lens.
If you photograph events and want the camera to use faster shutter speeds, setting Auto +2 will use 1/200th sec. for a 50mm lens.
Tips for Using Auto ISO in the Nikon Z
Program "ISO sensitivity settings" to your My Menu for quicker access.
In most Nikon Z cameras, you can program a custom control to "ISO setting" in Custom settings f2. Hold that custom control, then use the sub command dial to toggle Auto ISO on and off. Using this method with the Nikon Zf, you can set your ISO dial to C and use the main command dial to adjust ISO/minimum ISO.
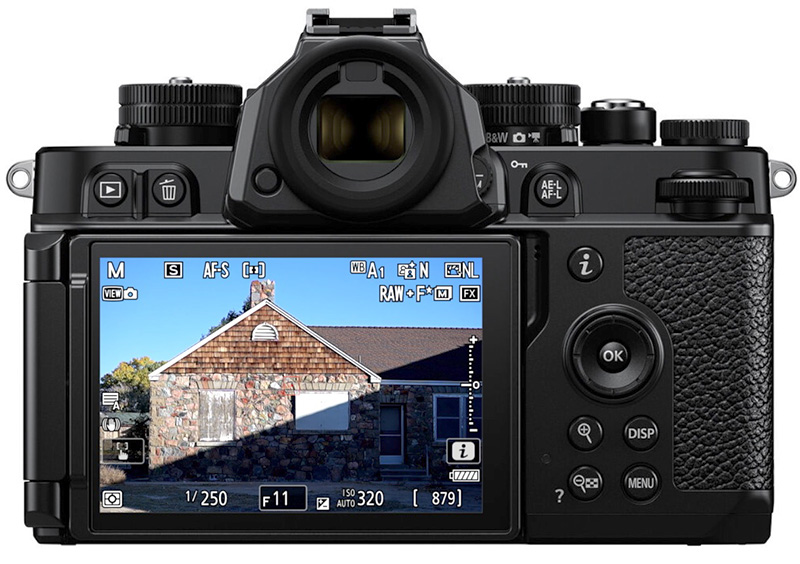
You'll see "ISO Auto" on the display with the ISO that will be used with your other exposure settings. It will flash unless it's at the minimum ISO.
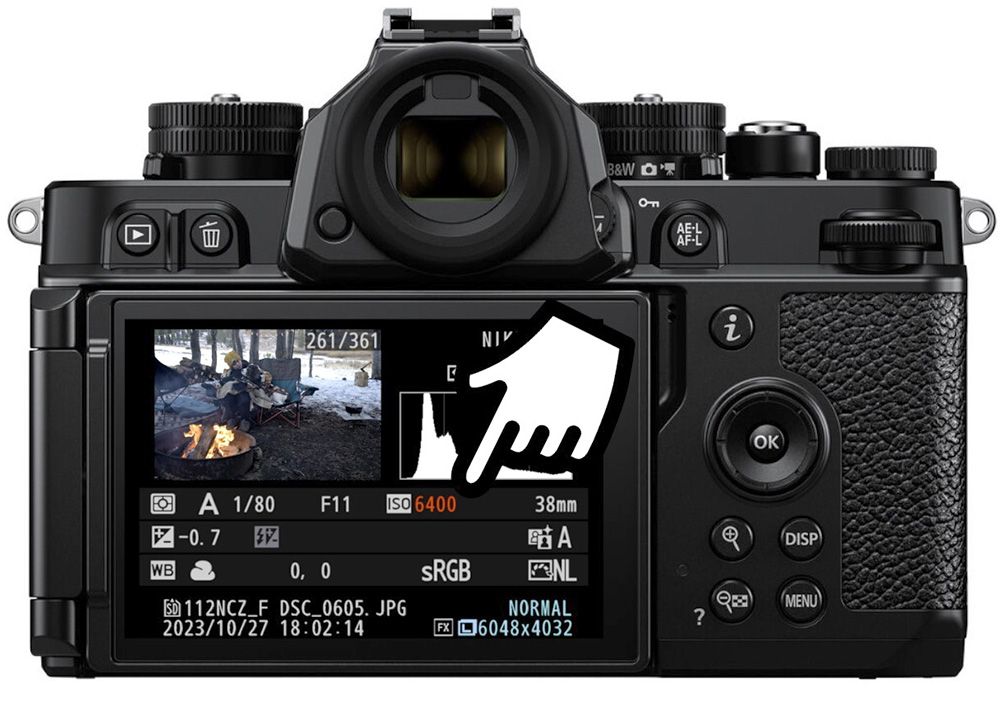
In Playback mode, photos created with Auto ISO will show the ISO in red.
As mentioned previously, I'm coming from Fujifilm systems, so I'm used to having three programs.
- Documentary program: maximum ISO 6400, minimum shutter speed 1/250 sec.
- Still life: maximum ISO 1600, minimum shutter speed Auto
- Very dark documentary: maximum ISO 12800, minimum shutter speed 1/125 sec.
How do I use Auto ISO in Nikon Z now? I use a hybrid of my first two programs. My maximum ISO is 6400 with a minimum shutter speed of Auto +1.
Note that Auto ISO can cause quirky behavior in Program Auto exposure mode when you're using the Flexible Program feature.
Increasing your maximum ISO on the fly - Nikon Zf
In dark light, when you need a higher maximum ISO than 6400 (if that's what your max is set to), you only need to rotate that top dial from 100 to the higher ISO. Setting it to a number higher than the programmed maximum will force it to use that higher number.
Changing your minimum shutter speed on the fly
What if the Auto +1 minimum shutter speed is too slow? I'm using a 24mm lens to photograph people on the street, which would give me a minimum shutter speed of 1/50th sec., which is far too slow to photograph people candidly.
If I was in Aperture Priority mode as I often am, all I need to do is flip the exposure mode to M. I ensure my shutter speed is set to 1/250th or higher, and now I'm in an aperture-shutter priority mode with Auto ISO.
Using Auto ISO with your Nikon Z takes practice
This is just one technique for using Auto ISO in Nikon Z cameras. Having the top dials in the Zf makes it much easier and intuitive for me, especially coming from Fujifilm systems - as I know many of you are doing. But it works just as fine in other Nikon Z cameras.
Practice using this system, figure out how to set it up, and practice more! Say goodbye to blurry photos (at least from motion blur - focus, that's another topic for another time!).
You can learn more about these systems in our Nikon Z tutorial courses, and use the code "blog20" for 20% off.


Very well explained, thank you!
And thanks for your tip on changing the shutter speed on the fly. It's a clever solution.
I additionally swapped the assignment of the two command dials. If I want to change the aperture quickly, I set it with the rear command dial. I use the grip from SmallRig, with which the front dial is difficult to operate.
Yes, I just added that grip and have found the same. I may be swapping them too 🙂