Disclosure: This post may contain affiliate links. I earn a small commission of product sales to keep this website going.
If you’re recording the RAW+JPEG file format, chances are pretty high that at one point or another, you’ve had some confusion about file organization, camera settings, RAW processor settings, and so on.
Recording the RAW and JPEG files offers excellent flexibility, not just in Fujifilm cameras but for all. Especially in Fujifilm cameras, many of us use those fantastic in-camera JPEG settings to get the pictures we want straight out of the camera—no extra processing required.
But you also have those RAW files as a backup, an archive, a way to go back and reprocess those photos should you ever want or need to.
That begs the question, how do you manage a RAW+JPEG workflow in the camera, in your computer software, and for file storage?
This article will start with Fujifilm RAW+JPEG settings but is universal to all cameras afterward.
Fujifilm Camera Settings for a RAW+JPEG Workflow
File types
If you’re not already recording the RAW+JPEG file format, you must set that up in your Image Quality Setting menu > Image Quality. Here, you’ll choose a JPEG quality plus the RAW file. I recommend FINE+RAW for the best quality possible – that’s why we want the JPEGs, right?

Dual card storage
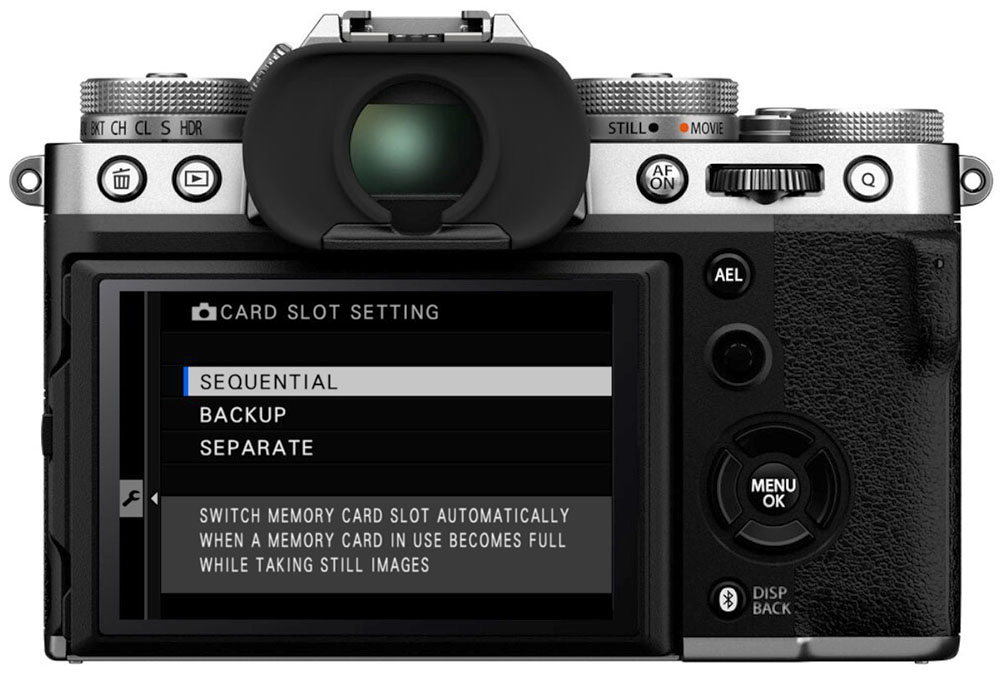
You’ll need to tell the camera where to store the files if you have a camera with two memory cards. Do this in the Set Up menu > Save Data Set-Up > Card Slot Setting.
- Sequential: I recommend setting this as a default. Your RAW and JPEG files will be recorded to the same card until that card is full, then switch to the other one.
- Backup: I recommend setting this to have a backup if you’re doing paid/commissioned work. I’ve never had disastrous in-camera memory card problems in 20 years of using digital cameras. That’s not to say it’ll never happen, but set this if the consequences are high.
- Separate: I do not recommend this if you want to have both JPEG and RAW working files. It adds extra work downstream. Keep paired files on the same card (Sequential or Backup).
Software-Specific Settings for RAW+JPEG
A RAW+JPEG workflow can present several problems, or at least things you must consider when importing & working with the files:
- Each RAW/JPEG pair should have the same names when you rename them. If they don’t, making sense of the pairings will be nearly impossible.
- When editing (ratings, metadata, etc), do you want it to apply to the pairing or individual file types? This includes deleting the rejects. My recommendation is to apply to the pairing.
- When processing (color, toning, etc), you probably only want that to apply to the RAW file.
Here are a few software-specific settings to check for this kind of workflow. If you’re using software not mentioned here, check the user manual to address the abovementioned considerations.
Photo Mechanic
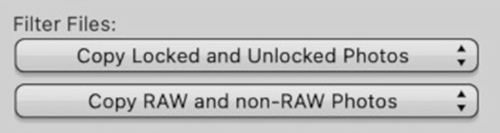
- On the Ingest screen, under Filter Files, choose “Copy RAW and non-RAW Photos.” All RAW/JPEG pairings will be treated as one file – copied to the same location, renamed with the same name, with the same metadata template applied.
- When editing, set View > Combined Images. You’ll see the .raw+jpg file extension in the thumbnail grid. All metadata changes will be applied to both files. This hotkey is Ctrl(PC) or Cmd(Mac) + J.
- When the photos are paired, and you want to send them to an external editor, choose whether you’ll send the RAW file or the JPEG to the external editor (RAW is recommended if you’re doing any tonal or color corrections). Do this in Preferences > Launching > When in RAW+JPEG Mode…

You can, at any point, “un-pair” the photos by pressing Ctrl/Cmd + J to exit Combined Images mode. Then, if you want to delete a specific RAW or JPEG file, for example, any changes you make to a photo will only be applied to that single file.
This workflow and all of Photo Mechanic’s other settings are covered in the Photo Mechanic Guide course. Use code “BLOG20” for 20% off.
Lightroom Classic
Lightroom Classic, unfortunately, doesn’t have an easy way to toggle between “RAW-only” and “RAW+JPEG” modes. You can’t even really pair photos in Lightroom Classic. You must treat them as separate files or only work with the RAW files. This is something that must be set up from the beginning for consistency.
If you want to be able to view both your RAW and JPEG versions in Lightroom Classic, you’ll need to treat them as separate files.
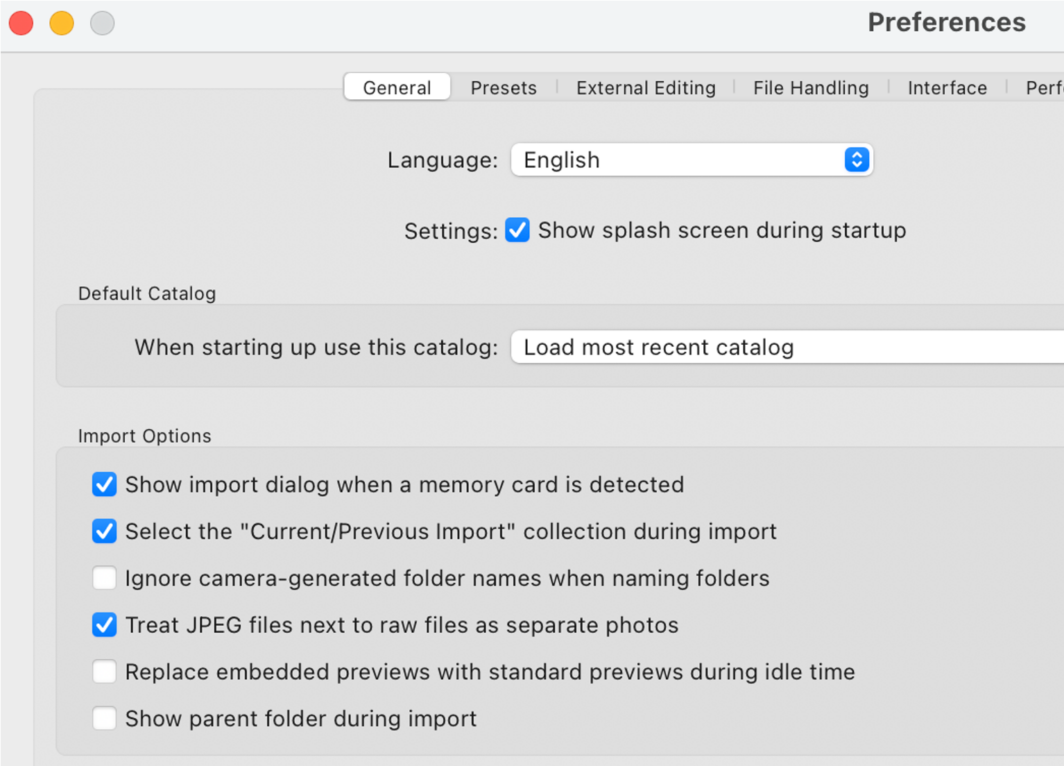
Go to Preferences > General and put a checkmark next to “Treat JPEG files next to raw files as separate photos.” You’ll see each RAW and JPEG file in the Import grid and your Library views.
Renaming will give them separate file name sequences, i.e. a RAW/JPEG photo might have file names example-001.RAW and example-002.JPG – even though they’re the same photo.
This can lead to all sorts of confusion unless you’re ready for it and have a plan to deal with it.
One strategy includes not renaming photos at import. Use Lightroom Classic to move your JPEGs into a “JPEGs” subfolder after import, then rename both your RAW and JPEG files separately to have the same sequence numbers.
You could also choose not to “Treat JPEG files next to raw files as separate photos” (the default). You will only see RAW files in the Import and Library views, which you will process. However…the JPEG pairings will still be imported to your hard drive with the same file names as their RAW pairings. The difference is that they will not be added to your Lightroom catalog, but you can do that later:
- Right-click on any photo to view it and the JPEG pairing in your computer’s file browser.
- Move the JPEGs to a “JPEGs” subfolder you create.
- Import that JPEGs subfolder into your Lightroom catalog.
Which method will you choose? That depends on how much you want to prioritize those JPEG files in your Lightroom Classic workflow – at the top or not at all?
Capture One
The Capture One import dialog will show you both RAW and JPEG files separately, and you can select which ones you want to import. You can also filter to see only RAW or JPEG files under the Filters option.
Unlike Lightroom Classic, however, when you rename them during import, each pair will have the same sequence number for better identification and organization.
After import, however, the photo pairings are treated as separate files. A change to one file will not automatically be applied to the pairing.
There are a few other things to note about Capture One:
- You can disable/enable editing JPEG photos in Preferences > Image > Editing. You may want to disable this if you don’t want to accidentally go crazy with tonal & color corrections in a JPEG photo. Or enable it if you’re going to do some basic cropping and retouching.
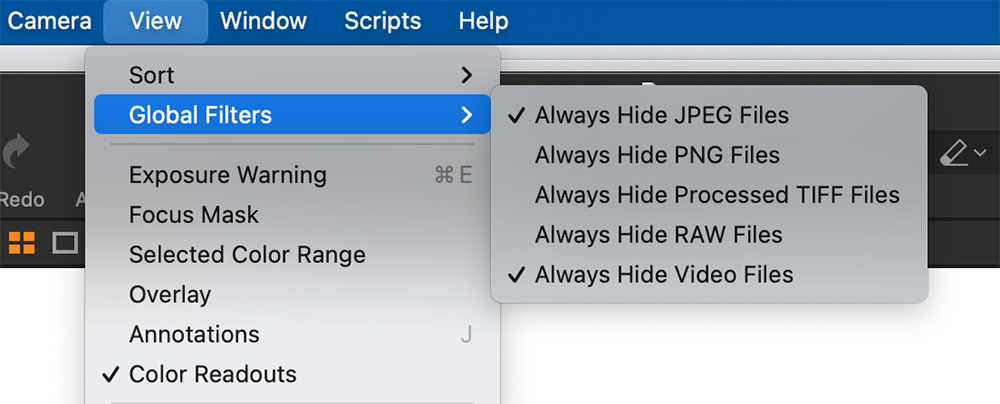
- You can filter to only see RAW, JPEG, or RAW and JPEG photos in View > Global Filters. You can change these views based on which versions you want to work with.
- Metadata changes are only made to the selected files (it’s not applied as a pairing). You’ll have to sync or apply to selected photos manually.
Archiving RAW+JPEG Files
So now you’ve got 200 RAW files and 200 JPEG files from an outing, for 400 total image files taking up space on your hard drive. Do you keep all the RAW files? Keep all the JPEGs? What do you delete, if any?
Well, that’s all a matter of personal preference.
I love using Photo Mechanic because my culling/editing process simultaneously applies changes to both file types. This means I can add metadata and delete the rejects without doing so for separate file types.
And that’s what I delete – all the rejects, the photos that might be out of focus, duplicates, bad exposures, awkward gestures, etc.
I keep all other RAW files because those are the photo archives. For the JPEGs, I’ll generally only keep the ones I want to share and/or think might add to my portfolio. They don’t take up a lot of storage space, but it adds up and just bloats the catalog.
So that’s my preference, which may or may not align with your needs.
Conclusion – a RAW+JPEG workflow
A RAW+JPEG workflow has a lot of advantages for many photographers but can make your workflow more complicated.
I recommend setting up your camera so that your RAW and JPEG paired photos are on the same memory card – so you don’t have to swap out memory cards during the importing process.
As far as software is concerned, Photo Mechanic is excellent for managing RAW and JPEG paired photos, with the flexibility it offers. Send the RAW files to your processor of choice.
Lightroom Classic is probably the most complicated and limited in working with RAW and JPEG pairings, which is a pity since it’s also probably the most popular among photographers.
There are countless ways to crack this nut, and I hope these recommendations help. If you have any others, please leave them in the comments!
Fabio Morniroli
Wednesday 25th of September 2024
Hello, I am using Luminar Neo, any advise about the best way to use JPEG and RAW files?
John Peltier
Wednesday 25th of September 2024
I'm sorry but I don't have experience with Luminar Neo. You'll need to figure out how it handles/displays RAW/JPEG files in the editor and then use the philosophy in this article that most closely matches that.