Disclosure: This post may contain affiliate links. I earn a small commission of product sales to keep this website going.
Tips for winter photography
We’re off to a late start for winter this year. Or a no start? Either way, it’s still a good time to remember what we need to do when we take pictures in the cold.
1. Expose correctly for the snow

Even though this ice isn’t lit directly by the sun, it was still rather bright. Exposure should be bumped up so it appears white instead of gray.
The camera wants to make everything gray. That’s just the nature of automatic exposure meters. If you leave the camera to its druthers, it’ll turn white snow into gray snow because that’s what it’s engineered to do, to average out a scene for middle tones. See my Understanding Exposure Compensation post if you’d like to read up more on this.
Snow isn’t gray!
- If you’re shooting in any kind of automatic mode (Aperture Priority, Shutter Priority, Automatic, etc) you’ll want to adjust your exposure compensation to somewhere between +2/3 to +1 1/3, depending on the scene. If you can set your metering mode, Evaluative or Center Weighted will keep your camera honest.
- If you’re shooting in Manual Mode, adjust your aperture, shutter, and/or ISO to meter for +2/3 to 1 1/3. You can set your metering mode to Spot or Partial, point your camera at the brightest snow for your metering, then recompose.
These rules aren’t really rules, just a starting point.
If you use the histogram while shooting, the snow should be towards the right side, but not stacked up against the wall.
You could always adjust for this in post-processing, and sometimes you might need to if you need to preserve even brighter areas. But we always strive for “perfect” during capture when we can.
Bonus: set White Balance to Shade or Shadow if the snow isn’t in direct sunlight, otherwise your camera may render the snow with a blue shade.
2. Dress in layers but maintain use of your fingers!
It should go without saying: dress in layers, and cotton kills.
- Wearing multiple lighter layers will give you more options to regulate your body heat. One bulky jacket doesn’t give you any options.
- Cotton sucks the heat out of you when it’s wet. Wear wool or synthetics that wick moisture away and dry quicker. I prefer wool because it’s naturally antimicrobial and I stink after a long hike.

Perhaps the biggest thing to consider is finger dexterity. You’ll need to both keep your fingers warm but be nimble enough to adjust those buttons and dials. And if you have a camera with a touchscreen and you use it, you’ll need special gloves for that too. Here’s my suggestion:
- Wear a light glove made of wool or synthetic fleece that will keep your fingers warm while you’re actively shooting. It may not be totally warm, so-
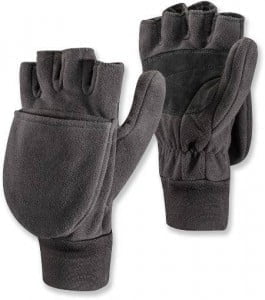
- Wear some convertible mittens on top of that. You know, the ones that fold back and expose the fingers. Mittens will do a better job of keeping your fingers warm, and you can more easily stuff a charcoal heat pack into them for extra warmth. The ones pictured here from Black Diamond aren’t really waterproof, but they give you an idea of what I’m talking about.
There’s nothing worse than bulky gloves that won’t let you change your camera settings when you need to!
 3. Keep your batteries warm
I’m sure you’ve all noticed that as soon as you take your phone out into the cold, the battery can drop from 80% to 15% in what seems like seconds. The same thing happens to your camera batteries. Those little electrons just stop moving.
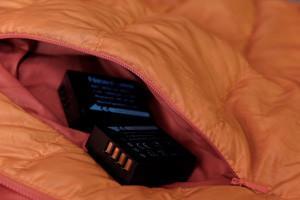
Take your battery and any extras out of the camera & bag and put them in a pocket close to your body. You’ll want to make sure that you can easily access this pocket. Pop the battery into the camera when you think you’ll be shooting. When you’re done shooting for a while, take it back out of the camera and put it in your pocket.
See these other tips for extending your camera battery on the trail.
4. Prevent condensation on & in the lens, and inside the camera
Have you ever taken a photo and then noticed that the lens is fogged over? Noooo! And have you breathed on it to try to make it go away? That just makes it worse.
Condensation forms in these two situations. We’ll skip the physics lesson, but as far as photographers are concerned, this is when it’ll happen:
- Surface temperature rapidly cools
- Humidity rapidly increases
So when you’re going out, take the lens cap off and let the lens cool down close to outside air temperature, and leave your bag open. This may take a few minutes. Temperature & humidity variations are more or less equalized, then you can put it back in your bag since it will stay cool there.
When you’re coming back in, take the memory card out of the camera while you’re still in the cold and then put the camera in your bag and zip it up. Bring the camera back inside and let it warm up slowly by keeping it in the bag. At least you have your memory card ready to download.
Avoid breathing on your lens. Even just looking at it, say, to clean it, will add humidity from your breath and fog it up.
Having a good zoom lens on your camera will negate the need to constantly change lenses and will keep the insides of your lens & camera even safer.
5. Be able to quickly access your gear
This is more or less a general rule for hiking & backpacking but is even more important to remember during the winter when we keep everything, including our packs, bundled up.

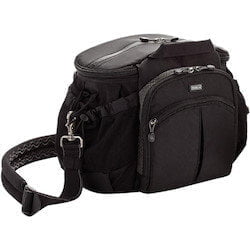
Think Tank’s Speed Demon, a convertible hip/shoulder pack that works great for me in winter (and year round).
This is even more important during the winter when you won’t want to be continually taking off your pack and setting it down on the cold, wet ground, or on icy slopes.
I’ve really started to warm up to hip belts (warm up, get it!?!? Haha). I wore Think Tank’s Hubba Hubba Hiney while backpacking the John Muir Trail and loved having it all right in front of me all the time.
If you’re carrying a lot of camera gear you can keep most of it in your backpack. But at least have your camera, and maybe another lens, at the ready in a hip or chest pack that you can easily access with heavy gloves if you need to.
I’ve recently started using Think Tank’s Speed Demon. It’s a convertible hip/shoulder pack, larger than the Hubba Hubba Hiney, but not obnoxiously large. I’m currently keeping my Fujifilm X-T1 & 18-55mm f/2.8, plus 50-140mm f/2.8 lens in it. It even works on the slopes.
