Disclosure: This post may contain affiliate links. I earn a small commission of product sales to keep this website going.
This article is an excerpt from my Lightroom Guide online photography course.
One of the struggles of a mobile photography workflow is getting photos from your camera to a mobile editing program while traveling and then syncing those edits to your main photo library when you get home.
Syncing between Lightroom and Lightroom Classic can significantly help in this phase of the photography workflow, even if you don’t use Lightroom or Lightroom Classic as your primary editor of choice.
For example, you can start your culling process on a mobile device, picking your selects. Upon returning home, you can import those into your Photo Mechanic Plus library and process them in Capture One or Photoshop. Or just continue in Lightroom Classic.
In this article, you’ll see how to get photos from your camera to the cloud and then from the cloud to your desktop.
Lightroom has been called a thousand things over the past decade, so for this article, I will refer to Lightroom Classic as Lightroom Classic and the mobile version as just Lightroom.
Limitations of syncing between Lightroom versions
This workflow is not without its problems and limitations. There are a few things you’ll need to consider first before syncing between Lightroom and Lightroom Classic.
Getting photos to your mobile device
The first hurdle is just finding a way to get photos from your camera to your mobile device!
Using an SD card reader is probably the simplest, cheapest way to transfer RAW files. These exist for both Android operating systems and iOS.
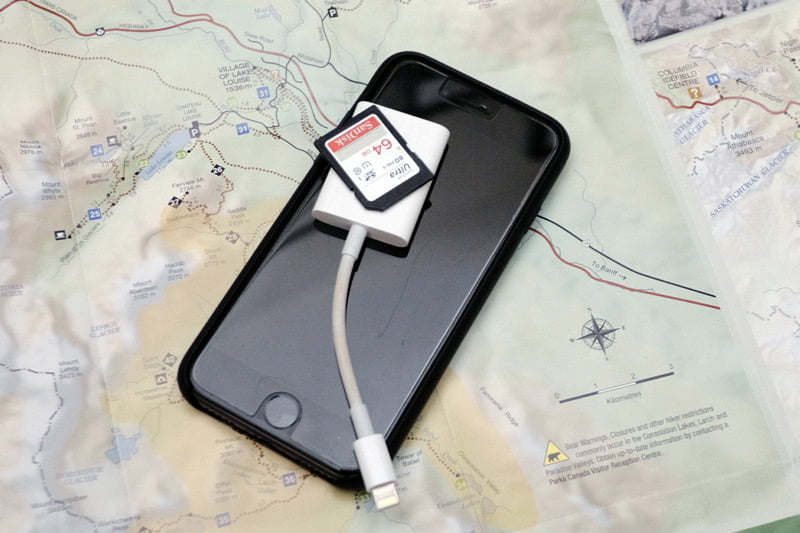
You’ll need to be sure that your mobile device has sufficient storage capacity since those RAW files must stay on your device until they’re uploaded to the cloud.
If you’re not transferring RAW files, nearly every camera brand offers ways to transfer JPEG files to your mobile device wirelessly.
This article outlines how to import photos into Lightroom once you have a way of doing so.
Connectivity
This entire syncing process assumes that you can get your photos to the cloud!
Lightroom will automatically start syncing your photos to your Adobe Cloud storage account when an internet connection is present, either cellular or WiFi (you can disable cellular in the App Settings).
Slow connections and large volumes of RAW files will obviously take quite some time to transfer everything to the cloud. This will happen quickly with fast connections and small selections of JPEG files.
Just be prepared for this phase of your workflow; it can sometimes move as fast as cold molasses.
Cloud storage
Uploading RAW files to your Adobe Cloud account will eat up storage quickly.
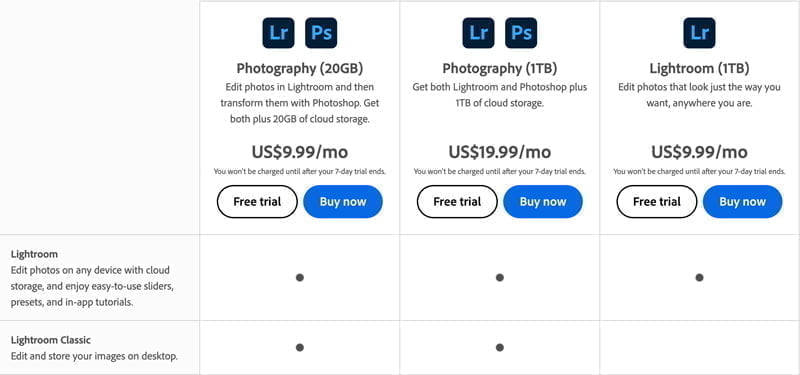
The basic $10 plan offers up to 20GB of storage on the cloud, which will likely be nowhere near enough for a weeklong trip and recording RAW files.
The $20 plan jumps all the way up to 1TB of storage. This should be more than adequate for this workflow, especially if you pick up in Lightroom Classic or a different editing program when you get home. You don’t need to keep those files on the cloud.
Setting up Lightroom and Lightroom Classic for syncing
You’ll need to set up some things in Lightroom Classic before syncing from Lightroom.
Setting up Lightroom Classic Preferences
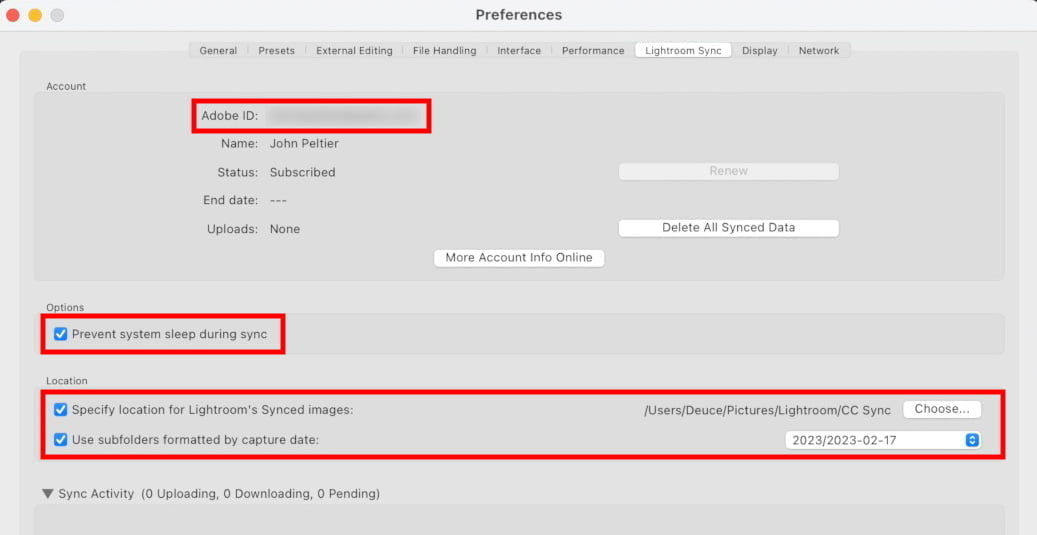
Open up the Lightroom Classic Preferences menu (Ctrl(PC) or Cmd(Mac) + ‘) and go to the Lightroom Sync tab.
- Ensure the Adobe ID is the one you want to use for your cloud syncing. If this is incorrect, you’ll need to sign out of the Creative Cloud app and back in with a different account.
- Enable Prevent system sleep… If this is disabled, your computer will sleep, and all syncing will stop.
- Set up your folders. Specify location… allows you to change the location where your photos synced from the cloud are stored on your computer. They go to your system’s Pictures folder by default. You can also enable dated subfolders; this can help your organization if you’re syncing a lot of photos.
You’ll also want to go to your Lightroom app and ensure that you’re using the same Adobe ID there too. Click on the “gear” icon in Lightroom to go to your App Settings and confirm the account you’re using.
Enable syncing
Be sure to set up your account and folders before this step. Once you enable syncing, the cloud sync will start with whatever you have set in your Preferences!
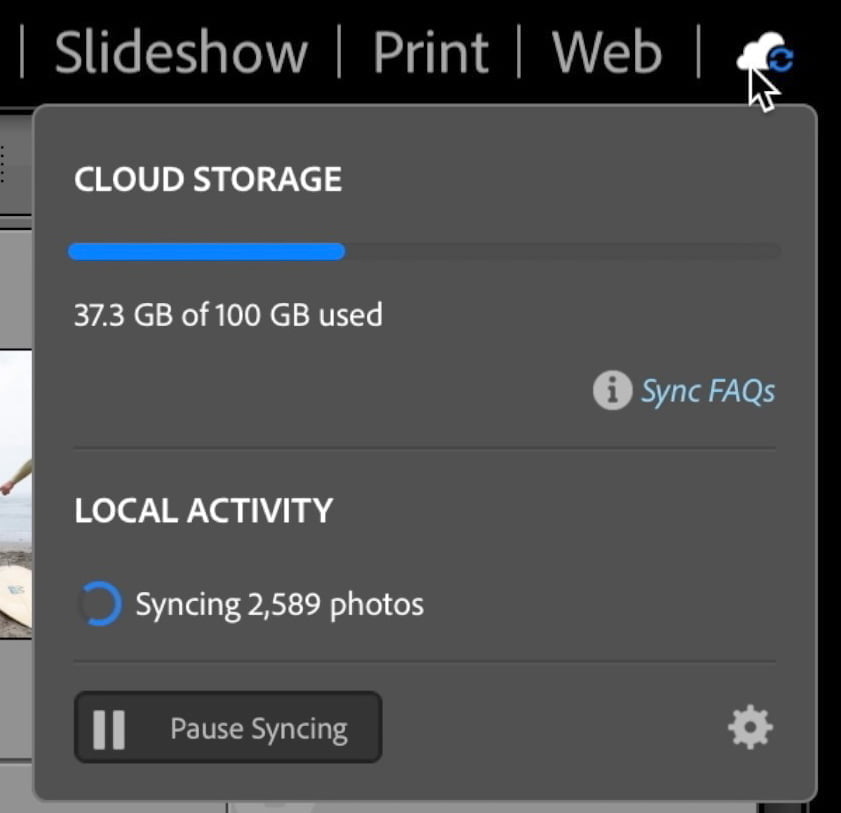
Click on the Cloud icon in the upper right of your Lightroom Classic app. Here you can see:
- Storage status
- Sync status
- Sync preferences shortcut
A button on the bottom of that popup says “Start Syncing” (or Pause Syncing if it’s already been enabled).
Any photos in your Lightroom library will start syncing to Lightroom Classic once you click on Start. We’ll see where those go next.
Syncing from Lightroom to Lightroom Classic
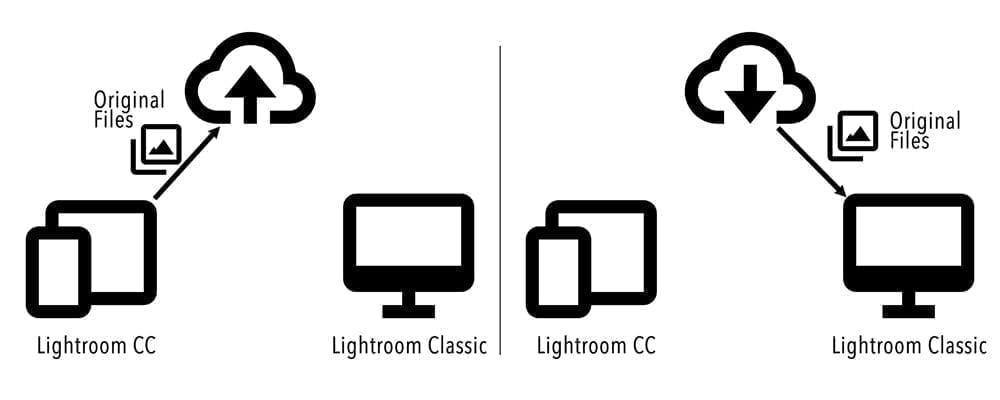
As mentioned above, clicking Start Syncing in Lightroom Classic will pull all photos from the cloud into Lightroom Classic.
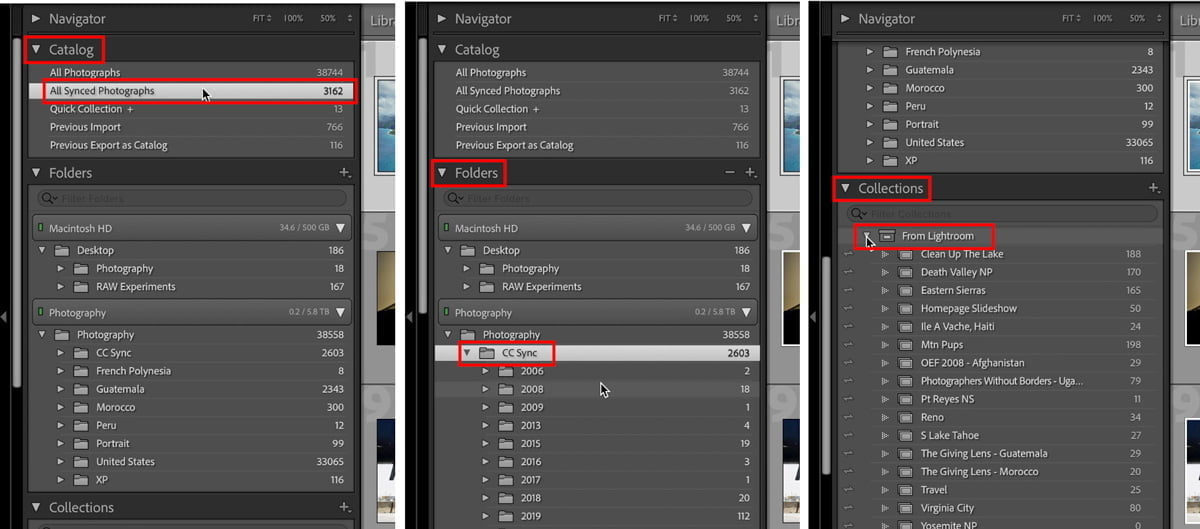
Synced photos appear in a few different locations in Lightroom Classic:
- In the Library module, under Catalog > All Synced Photographs.
- In the Library module, under Folders, then the folder specified in Preferences.
- In all modules, under Collections > From Lightroom. This collection set will mirror your Lightroom Albums as Lightroom Classic Collections.
There are some other things to know about photos synced from Lightroom to Lightroom Classic:
- The original files will be saved to your computer’s local drive, specified in the Lightroom Classic Preferences.
- If you want to move the storage location for any of these photos, you must do so within Lightroom Classic to not break the catalog database link.
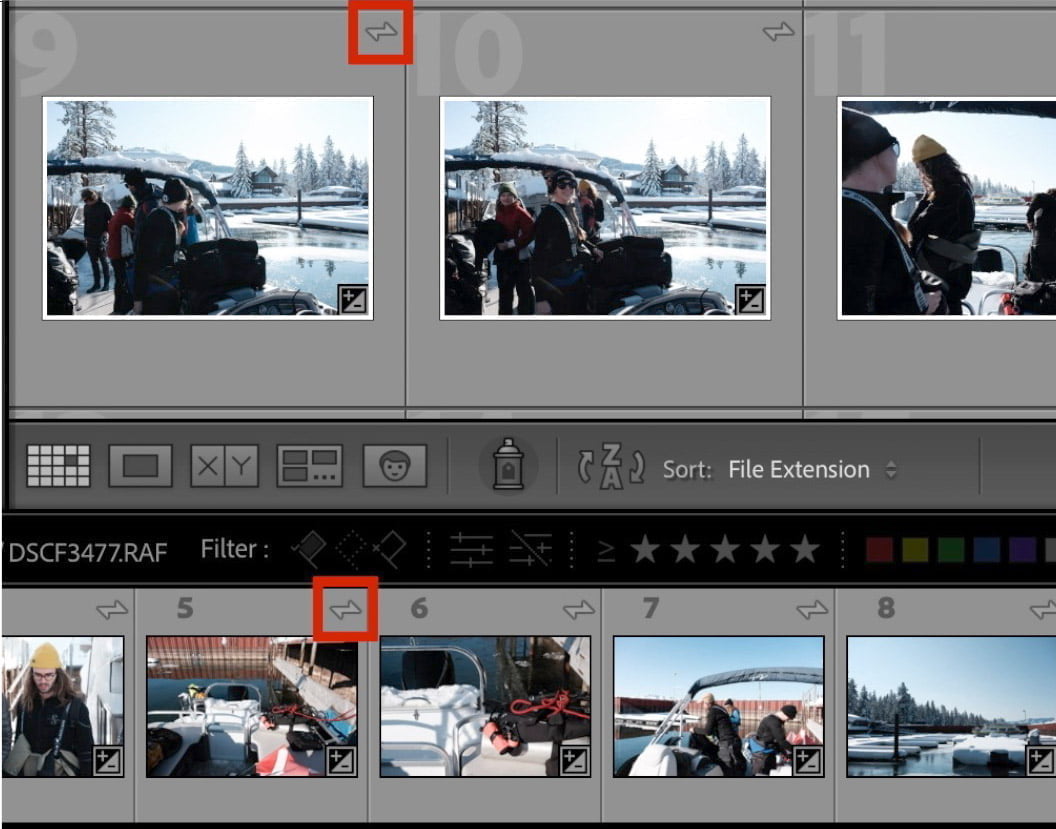
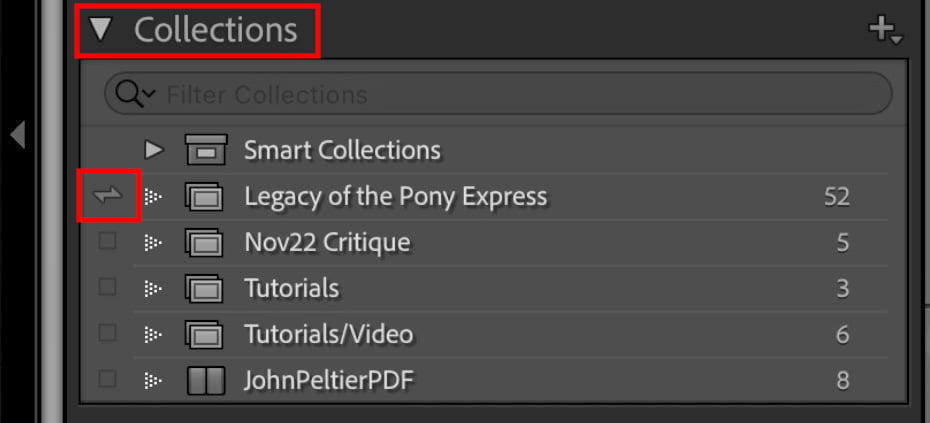
- Synced photos/collections/albums will have a two-way arrow icon to show they’re synced to the cloud.
- All edits made to synced photos will be reflected in Lightroom.
Because the original files are now saved to your computer, it’s safe to remove those photos from the cloud. You may want to do this so you don’t run out of cloud storage if you’re syncing a lot of photos.
- You can move those photos to a new folder on your drive. Do this in the Folders section of the Library module.
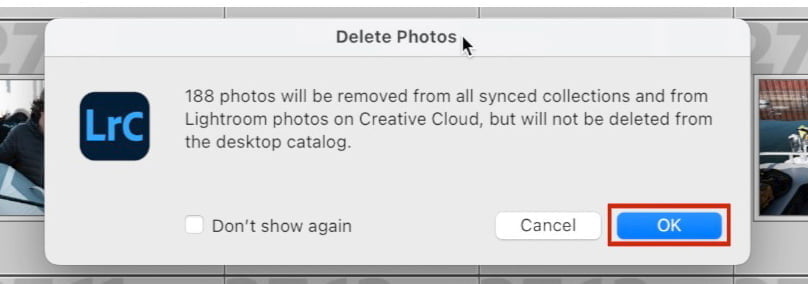
- Go to the All Synced Photographs folder found in the Catalog section of the Library module. Select the photos you want to remove from the cloud and press Delete. Click “OK” in the popup to remove them from the cloud and all collections/albums they were in. The originals will now only exist on your computer.
Syncing from Lightroom Classic to Lightroom
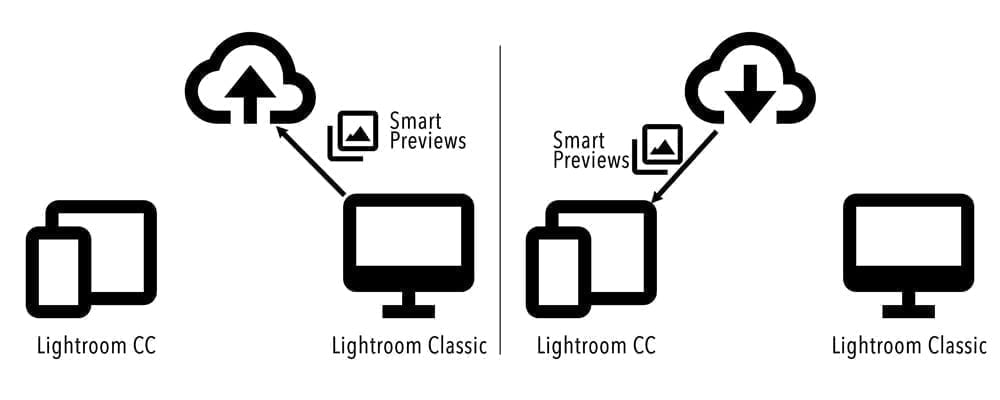
So that’s syncing photos from Lightroom to Lightroom Classic, a common scenario if you’re traveling and want to back up your photos while on the road.
But what about syncing from Lightroom Classic to Lightroom? This scenario might apply if you want to work on photos you’ve imported into Lightroom Classic while on the road, within the Lightroom app.
To do this, you must sync Collections. Only Collections can be synced, not Folders.
- Click on the “plus” icon in the Collections section and create a new Collection.
- In the popup menu, click on the option that says “Sync with Lightroom”.
- Put all photos you want to sync to the cloud in this new Collection.
- Verify the Collection has the two-way sync icon next to it.
- Synced Collections will appear in Lightroom as Albums.
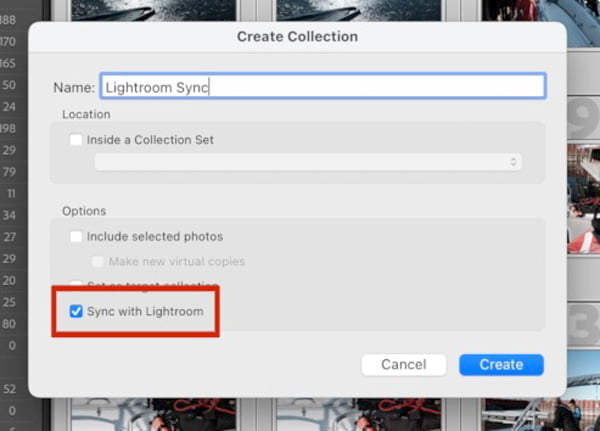
Some things to know about syncing from Lightroom Classic to Lightroom:
- Only Smart Previews are synced. These do not count against your cloud storage. You can still process photos using Smart Previews but the original files will not be available from Lightroom.
- Any synced photos removed from Lightroom will also be removed from the Collection in Lightroom Classic, but the original file will stay where it’s at.
Summary
That’s a lot of information! But let’s summarize it here:
- Ensure you have the same Adobe ID between Lightroom and Lightroom Classic.
- All photos will be synced from Lightroom to Lightroom Classic, where they will show up under All Synced Photographs. Any photos in Lightroom Albums will show up in Lightroom Classic as Collections.
- Lightroom Classic Collections can be synced to Lightroom, where they will appear as Albums. Only Smart Previews are synced.
- All changes made to synced photos will be reflected in both Lightroom and Lightroom Classic.
- Removing synced files from the cloud does not remove them from Lightroom Classic.
I hope this helped! Please let me know if you have any questions or additions below.

David A
Tuesday 23rd of May 2023
Great easy to follow overview of what can be a confusing process. Thanks for this. One tip that I will add is that the 20GB plan limit is not an issue if you don’t mind syncing in batches. When I travel, all my photos go on my iPad, and the originals stay on the SD cards as backup. The first 20GB will sync to Adobe and then stop. When I get home, I delete those first ones in the “From Lightroom” Collection in LR Classic, and another 20GB will sync and so on. It’s kind of a pain, but I don’t want to double the cost of my Adobe subscription just to eliminate this one step for travel.
John Peltier
Tuesday 23rd of May 2023
Great tip, thanks for pointing that out. Yes, everything just "stays in the queue" if your storage is full.
Bjørn Ivar Haugen
Thursday 13th of April 2023
Hi, that was interesting. Is it smart to have LR Classic on the main PC at home and LR CC on the laptop when travelling? So you can import pictures to the laptop and sync. them when arrived at home? Is that a way of doing it?
Verdi
Saturday 22nd of November 2025
@John Peltier, I'm not sure I follow. I have my catalog called "Travels" stored locally on my external drive that is connected to my desktop at home. I plan to travel abroad and would obviously take some pictures.
Can I do this, instead? : (a) copy Travels catalog (along with other supporting filesfor the catalog) from my local external drive that is connected to my desktop to my portable drive; (b) use this copied Travels catalog to import photos from my SD Card so that my Travels catalog can include new photos and do editing as usual with my laptop; and (c) when I get home, I copy back this Travels catalog to my external drive at home to continue my editing of new photos.
Will it work like normal ?
John Peltier
Thursday 13th of April 2023
Yes, that's one way of doing it if you bring your laptop! You have another option with your laptop, to import everything into LR Classic on the laptop and then transfer the files to your normal external storage location when you get home - so long as it's a shared Catalog between your laptop and PC (like keeping your Catalog in a synced cloud folder). You can also put those photos in a synced Collection so they're also backed up to your Lightroom cloud account. The first option - the one you mentioned - may be simpler though. There are a lot of ways to do it!