Disclosure: This post may contain affiliate links. I earn a small commission of product sales to keep this website going.
Flash guide numbers, just like the Inverse Square Law, are one of the mysterious specifications about portable flashes that keep many new photographers from using them in Manual mode.
But once you understand what a guide number is and how to calculate it, using a manual flash becomes much easier.
Portable flash units – speedlights, shoe-mount strobes, whatever you call them – are such an important tool for every photographer.
Manual flashes are simple when you understand them, but getting to that point with guide numbers and inverse square laws and whatnot can put people off.
You’ll even need to have an understanding of guide numbers if you only use TTL flash.
What is a guide number?
In short, guide numbers on a flash indicate how much light that flash can produce.
You’ll see them in the specs indicated in either meters or feet. The higher the guide number the further the flash will reach.

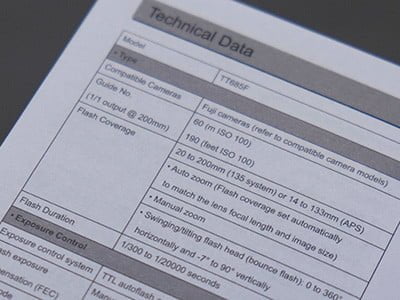
The specifications will also show the flash settings at which the guide number is calculated, including the ISO and flash zoom setting.
I use the cheap Godox units. They have a guide number of 60 meters, calculated at ISO100 and a full flash zoom setting of 200mm.
The more expensive Sony units, for example, have the same guide number but are calculated at a flash zoom setting of 105mm.
So the Godox units aren’t as powerful. Pay attention to these specifications when looking at flash units.
We’ll use a Guide Number of 60 meters in all of these examples.
The flash guide number formula
Before we can understand anything further we need to know how the flash guide number (GN) is calculated.
Distance * Aperture = GN
Flash exposure on your subject is dictated by aperture, ISO, and distance (see Inverse Square Law). Shutter speed doesn’t have much to do with it until you get into sync speeds but that’s another topic for another day.
So if our guide number is 60, that means that at ISO100 and an aperture of f/1.0 we’d get a correct flash exposure at 60 meters.
60m * f/1.0 = 60
It seems simple, right? It would be if we were always 60 meters from our subject, shooting at ISO100 and an aperture of f/1.0.
But that’s not reality.
How do you use a flash guide number?
Finding the maximum distance for your flash when changing aperture
Now, what if we wanted to shoot at f/11 to get some depth of field, to have our foreground and background more in focus.
How far would our flash reach for a correct exposure?
Distance * f/11 = GN60
…solving for distance we have…
Distance = 60/11
…which is 5.5 meters, or 18 feet for us stubborn Americans.
We’d get a (hopefully) perfect exposure at 5.5 meters now, not 60, with our aperture at f/11.
That makes sense because the smaller aperture of f/11 lets in much less light than a wide-open aperture of f/1.0.
Still with me?
Changing ISO
Bumping up your ISO will make your sensor more sensitive to light, meaning you’ll get more out of your flash.
In our example above, if we needed to have our flash further than 5.5 meters from our subject, we could increase our ISO.
What’s our new distance at ISO200?
Well, ISO isn’t in our guide number formula. Only the aperture is.
ISO200 is a one-stop increase from ISO100, which would be the same as increasing our aperture one stop from f/11 to f/8.
Distance * f/8 = GN60
Distance = 60/8
…which is now 7.5 meters at ISO200, compared to 5.5 meters at ISO100.
Reducing flash power
Sometimes we need to reduce the flash power to have faster cycling times, get more out of our batteries, or avoiding overheating.
Flash units allow you to reduce the flash output, from 1/1 to 1/2 (half-power) to 1/4 (quarter-power) to 1/8 and so on, down to 1/128 typically. Each reduction in flash power is a one-stop decrease.
Unfortunately halving our flash output doesn’t mean we can halve our distance…we still have to do math.
What’s our flash distance at ISO100, f/11, and 1/2 power?
Reducing the flash output by one stop (from 1/1 to 1/2) would be the same as reducing the aperture one stop to f/16 (from f/11 to f/16). So let’s plug that into our formula.
Distance = 60/16
…comes out to 3.75 meters.
Remember from our first example that at full power we had 5.5 meters. Now we have 3.75m at half power.
Final exam
Switch up what we need to solve for – we want to have our flash 4 meters from our subject and a shallow depth of field using f/1.4.
What power setting will we need?
We can’t solve for flash power using the guide number formula. We know that at full power we have a guide number of 60, and we want to be 4 meters away, so let’s solve for aperture at full power first.
4m * Aperture = GN60
Aperture = 60/4
…which is 15.
There is no f/15, so let’s round to f/16. We’d get a good exposure at f/16, but we want to shoot at f/1.4.
How many stops away is f/1.4 from f/16?
- 16 to 11
- 11 to 8
- 8 to 5.6
- 5.6 to 4
- 4 to 2.8
- 2.8 to 2
- 2 to 1.4
Seven stops increase in aperture. So we need to reduce our flash seven stops to balance it.
- 1/1 to 1/2
- 1/2 to 1/4
- 1/4 to 1/8
- 1/8 to 1/16
- 1/16 to 1/32
- 1/32 to 1/64
- 1/64 to 1/128
Tips for using flash guide numbers
- Many modern flash units have range scales on them in both TTL and Manual modes to make all of this much easier for you.
- These are only valid for bare flash heads! If you do anything with the light – bounce it, throw it through an umbrella – these numbers will be off.
- It’s important to remember that these numbers are also only valid at the noted flash head zoom setting. Adjusting the zoom setting of the flash will adjust the behavior of the light.
- Flash manufacturers really milk the testing conditions, so keep in mind that these are guide numbers.
- They’re still important to know if you only shoot in TTL – it’ll tell you how far the flash will reach when it’s at full power.
- You should have a way to calculate a flash guide number in the field (see below), use an app…
Or you could have a baseline for the kind of work that you do and start from there. Say you usually shoot environmental portraits at a distance of 3 meters, ISO400, and f/4.0. That’s a power of 1/128. But you’re also probably using a modifier of some sort, so bump it up one stop to 1/64.
Having this kind of “go-to” setting takes a lot of the guesswork out of it. After taking a sample exposure you usually only need to adjust by one or two stops in either direction. It’ll really speed things up.
Simple flash guide number calculator
This is just a simple guide number calculator that solves for distance, but you can play around with all of the different variables and see how they’re related.
You can also plug in a few anchor points and use those for your baseline starting points when you go out and shoot.
Guide number calculator chart
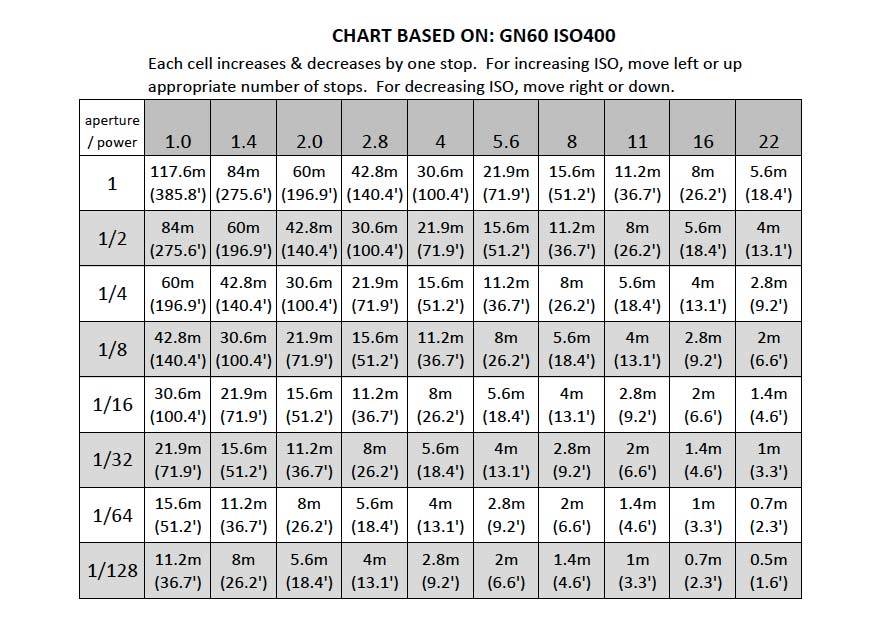
Using the guide number calculator, I’ve made this guide number chart for a Guide Number 60 at ISO400.
If you use an ISO of 800, you just move left on the chart one stop (one square). If you use an ISO of 100 you move right two stops. Make sense?
You can make something similar for your specific flash units using this calculator.
One of our readers, Karl, submitted a chart he made for an EF-X20 flash on his Fujifilm GF670 medium-format rangefinder (below). It affixes to the back of the flash unit and shows slight over/underexposures, as well as half-stops, similar to the camera.
Thanks Karl!


Chris
Friday 20th of December 2024
If you’re decreasing the ISO, why do you move rightward on the chart? That stops the aperture down, letting in less light. So with the ISO being lowered and already letting in less light, shouldn’t a decrease in ISO mean we move up or left? Not down and right?
John Peltier
Sunday 22nd of December 2024
Decreasing the ISO has the equivalent effect (as far as the flash is concerned) of closing the aperture. You move right on the chart for either stopping down in aperture or decreasing ISO the same number of stops.
Joe Dagistino
Tuesday 26th of November 2024
So when dealing with ISO, could you just calculate at iso 100 then change aperture or light power? Seems to work when you adjusted to shoot at f1.4 instead of f11
John Peltier
Tuesday 26th of November 2024
Yes, there are a lot of different ways to get to the same solution, which is important to understand because there are several other reasons you may choose to change one variable over the other not covered in this article, such as for control of depth of field, control of ambient light, maxing out your flash, etc.
Drew F
Friday 26th of January 2024
This has helped me so much with understanding my flash beyond trial and error. One quick question, what shutter speed should I be shooting at for this or does it not matter as long as it's within the sync speed limits? I'm looking to use a small flash with a GN of about 33 on my Olympus RC35 and HP5. I have about f2.8 around 35ft, f4 around 26ft, f5.6 around 19 and so on for iso 100. Is this all correct? also would that mean that I can shoot at further distances than the calculations since my film speed is 2 stops higher?
John Peltier
Tuesday 6th of February 2024
Hey Drew, glad it helped. If your GN is 33 feet, you're going to have about 12 feet at f/2.8, 8 feet at f/4, 6 feet at f/5.6, etc. But yes, that's all at ISO 100, so if you're using higher speed film, those distances will increase. If you're using 400 speed film, those numbers become 24 feet at f/2.8, 17 feet at f/4, 12 feet at f/5.6, etc. ISO 800 would be 28' at 2.8, 24' at 4.0, 17' at 5.6...
CGN Menon
Saturday 5th of August 2023
I am more or less a beginner in photography. Even though I had read about GN, the calculation was not properly understood until reading this article. A subject which was complex has been reduced to primary school Maths! Thank you.
John Peltier
Sunday 6th of August 2023
Glad to hear it, you’re welcome!
Better Bird Photography with Flash - Travel To Eat
Wednesday 24th of May 2023
[…] Guide Numbers for Flash […]