Disclosure: This post may contain affiliate links. I earn a small commission of product sales to keep this website going.
X-T50 Setup Guide
Here’s a basic X-T50 setup guide to walk you through some of the initial settings you should set up before creating photos.
These are merely recommendations. They’re how I have my X-T50 set up, and I’ll explain my reasoning behind each selection. If your needs are different, by all means, choose an alternate setting! Some of the settings maintain the defaults, and I just wanted to explain why I’ve kept the defaults for some of the more important settings.
We also won’t go over every single menu setting here; some of them are scenario-dependent and will change based on what you’re photographing. You can consider these the “base” X-T50 settings for general photography.
Check out the full X-T50 Tutorial Course if you want to see all menu settings, what they do, examples of each, recommendations, and how to customize the camera and use the focus and exposure tools.
If the Mode Selector Lever (next to the shutter speed dial) is set to AUTO, some of these settings will be disabled. Deselect AUTO to access these menus.
If you prefer the video version, watch here:

Image Quality Setting
These settings are how your image will be processed and recorded to the memory card.
Image Size: This only affects your JPEG/HEIF. I prefer the 3:2 aspect ratio to record the full sensor and crop later if needed. Medium is big enough if your JPEGs are going to the web or social media. I’d only recommend Large if you’re not recording the RAW file.
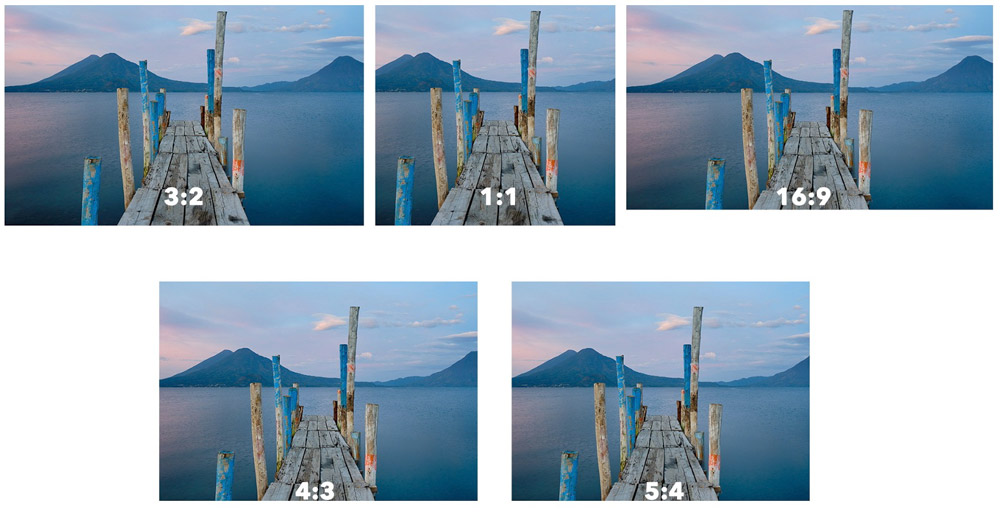
Image Quality: I record FINE+RAW to have both a high-quality JPEG and a RAW file. I try to get my in-camera JPEGs perfect, but I also have the option to reprocess the RAW file later. RAW files are nearly always a necessity when doing commissioned work.
RAW Recording: Lossless Compressed. This will record your RAW file using Fujifilm’s RAW compression algorithm to get a file half as large as Uncompressed. Just note that some file browsers like Mac Finder can’t extract the thumbnail preview.
Select JPEG/HEIF. Set JPEG. HEIF files are smaller than JPEGs and have higher tonal quality, but not all devices can display them. If you want your photos to be “universal,” set JPEG. Someday we’ll be able to set HEIF 🙂

The following handful of Image Quality settings is all about styling your JPEG photo. Read more about:
Or download the FREE Fujifilm Image Quality Settings Guide eBook.
Lens Modulation Optimizer: Keep this On so the camera can fix known lens characteristics like distortion & aberrations.
Color Space: Set sRGB to ensure your colors are accurate across all display devices. Adobe RGB should only be set if you’re doing color-managed printing of your straight-out-of-camera JPEGs. This setting does not affect the RAW file.
AF/MF Setting
AF Mode: ALL will let you cycle through all AF Modes (Single Point, Zone, etc) simply by pushing the joystick and rotating the command dial. This requires a specific Focus Lever Setting we’ll address soon.
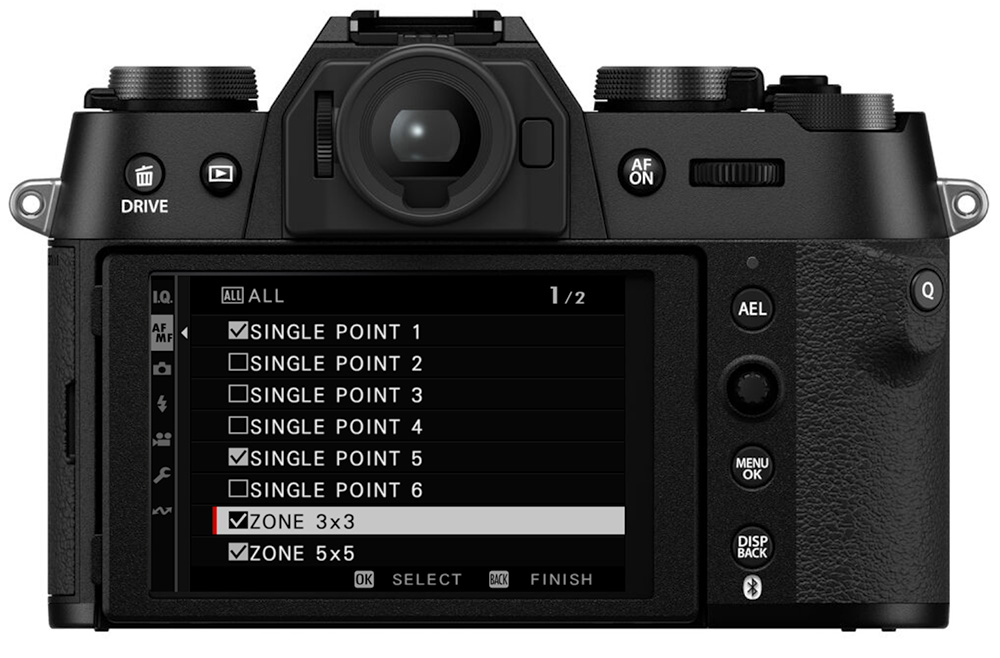
AF Mode All Setting: Because I recommended ALL in the previous setting, you’re going to have a lot of different AF Modes to scroll through when picking one. You don’t need all of the different sizes. Disable the ones you don’t want for both AF-S and AF-C modes. For example, I only want two Single Point sizes in AF-S, so I’ve only enabled Single Point 1 & 5.
Store AF Mode By Orientation: I like On so my focus area & positions are saved for both horizontal and vertical orientations.
AF Point Display: Off. If this is On, you’ll see a grid of focus points on your screen in Wide and Zone modes, and I find this rather distracting.
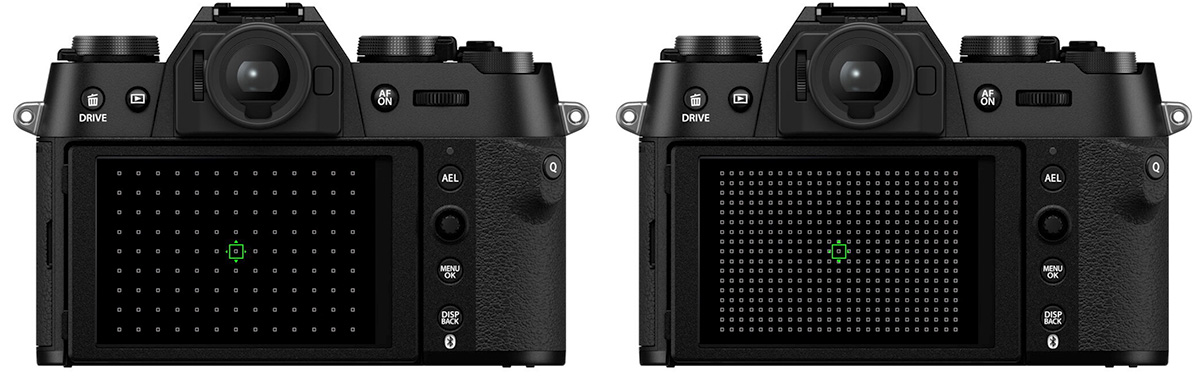
Number of Focus Points: I prefer 117 because I can move the focus point around the screen faster than if 425 is set. You may want 425 if you’re locked down on a tripod and need to move that focus point in smaller adjustments; otherwise, use the focus & recompose technique.
Pre-AF: Off. If this setting is On, your autofocus system will always be working, even when you’re not commanding autofocus. This is unnecessary with how fast the X-T50’s autofocus system is, and it’s a colossal battery drain.
AF Illuminator: Off. This feature turns on the light on the front of the camera to help focus in low light. However, it has a limited range, and that light can really surprise or blind people if they’re not expecting it.
AF+MF: On allows you to refine focus using the manual focus ring after autofocus has achieved a lock.
MF Assist: Your choice here will be situation-dependent and based on your preferences; you can learn more about these manual focus assists here.
Interlock MF Assist & Focus Ring: I love this new feature, and turn it On. This will “hide” the MF Assist tool set in the previous option unless you’re actively focusing. The overlays can be distracting, so it’s nice to be able to hide them until you use them.
Focus Check: Off. This is an automatic zoom feature that will zoom in on your focus point when manually focusing. The automatic feature I find distracting; you can manually do this whenever you want by pressing the rear command dial.
Instant AF Setting: I prefer AF-S so that when I press the AF ON button in Manual Focus mode, it behaves like single autofocus rather than continuous autofocus.
Depth of Field Scale: Film Format Basis allows you to use “zone focusing” in Manual Focus mode. Pixel Basis just isn’t accurate enough for much of anything.
Release/Focus Priority: Release for both AF-S and AF-C. This lets you fully press the shutter to create a photo even when you don’t have a confirmed focus lock. Note that this requires good shutter discipline because the camera won’t inhibit you.
Touch Screen Mode – Still Photography: Off, Area, or AF. If set to anything but Off, you can use the touchscreen to set the focus area. However, I find there’s a bit of lag when Touch Shooting is set.
Shooting Setting
Photometry: Multi. This is the most practical Photometry mode for nearly all situations, and I use it more than 99% of the time in conjunction with the histogram. You can read more about the other Photometry modes in this article.
Shutter Type: EF+M. While the electronic shutter is silent, and you may like that, it has many limitations. Electronic Front + Mechanical is a “smart” mode where the camera will choose the best between those two types.
Flicker Reduction: Off. Only turn it on if you’re photographing under fluorescent lighting and notice “bands” or horizontal lines in your photos.
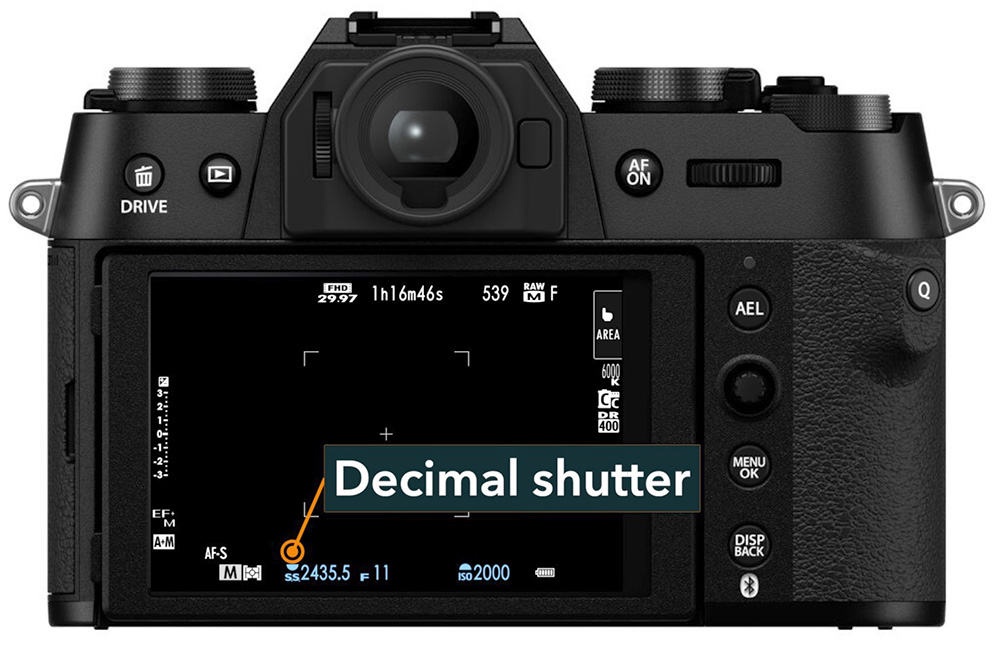
Flickerless S.S. Setting: Off. Only turn this one on if you’re photographing under fluorescent or LED lights and want to fine-tune your shutter speed in S and M exposure modes to match the flickering. You’ll see your shutter speed in decimal format on the screen, which can throw many people off; this setting is responsible for that.
IS Mode: Shooting Only. If you want to use image stabilization, use this setting. It will help conserve your battery by only activating it when the shutter is pressed halfway rather than all the time.
ISO: Read this article for information about programming & using AUTO ISO in your X-T50.
Flash Setting
Red Eye Removal: I like to leave this Off because it can cause more problems, but if you’re using the on-camera flash you can set it to Flash when photographing people and see how it does.
Movie Setting
We will keep this X-T50 setup limited to the still photography settings. The X-T50 Tutorial Course covers the Movie settings. But if you want to set something quickly to record movies, set the Movie Mode to FHD 16:9 29.97P for “standard” casual movie settings.
Set Up
The Set Up menu contains a lot to review. We’ll just hit the highlights for your X-T50 setup.
User Setting
Format. You should format your memory card the first time you use it with your X-T50 and periodically after that. This helps prevent corruption, but be aware that it will delete everything on the card.
My Menu Setting. I recommend programming and taking advantage of My Menu; you can read how here.
Sound Setting
Adjust the sounds as necessary. I usually turn them all off except for the Electronic Shutter.
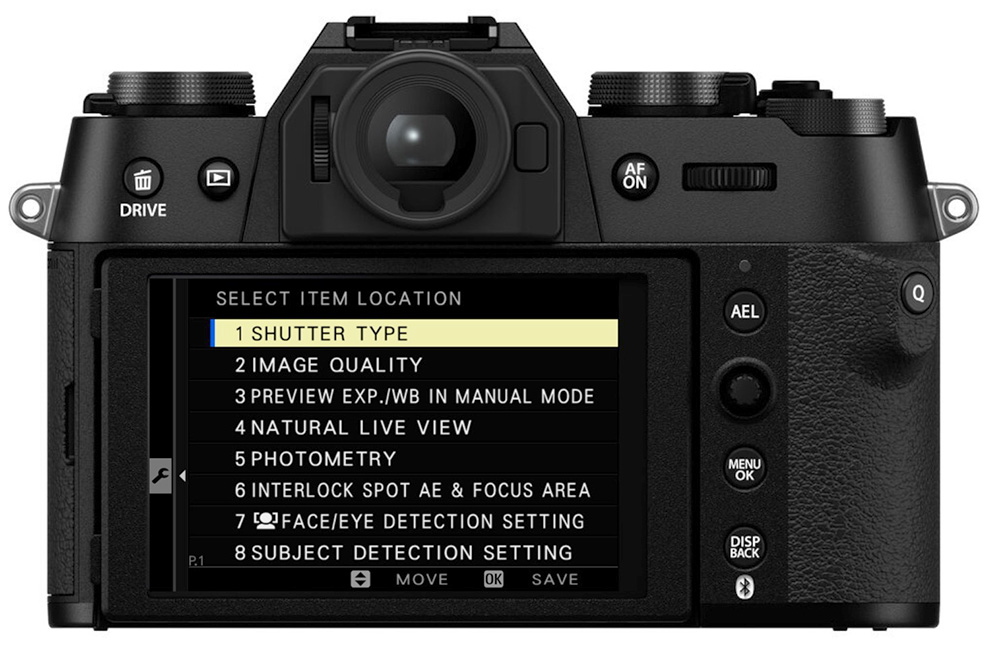
Screen Setting
View Mode Setting: For everyday use, I like Eye Sensor for shooting mode and LCD Only for playback. The LCD will be on in Shooting mode until you bring the camera up to your face, then the LCD will turn off, and the EVF will turn on. In Playback, the LCD will always be used.
EVF Brightness: Auto does a really good job of adjusting the brightness to match the ambient light.
LCD Brightness: 0 is a good starting point; you can turn it up if you need to in bright light.
Image Disp: Off inhibits automatic image playback after each photo. Use the Playback button to review your images when you need to. Setting something else may tempt you to “chimp” each photo, which can waste your battery and lead you to miss important opportunities when you’re looking at the last photo.
Autorotate Displays: On helps you read your displays when you rotate the camera.
Preview Exp/WB in Manual Mode: Preview Exp/WB shows the effects of your exposure and white balance settings in Manual exposure mode. However, turn this off if you’re working in studio strobe lighting.
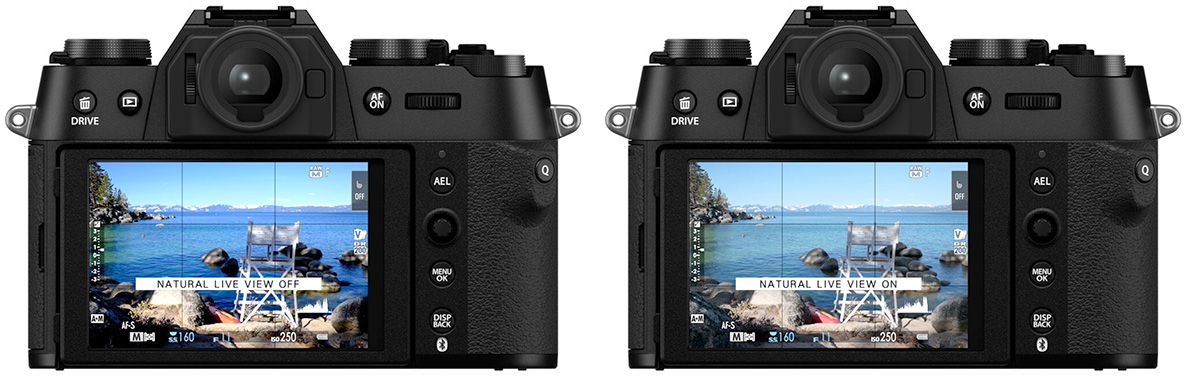
Natural Live View: Off if recording JPEGs. This lets you see what your Image Quality settings are doing to your final photo. If only recording the RAW format and you want to see the “raw” picture, you can turn this On.
Framing Guideline: Grid 9 is the standard “rule of thirds” grid that aids in composition and framing. Grid 24 is far too busy.
Disp. Custom Setting: From the defaults, I recommend enabling the Framing Guideline and Histogram.
Button/Dial Setting
Focus Lever Setting: Reset for PUSH so you can push the joystick and recenter the focus point. Edit Focus Area for TILT so you can tilt the joystick and then move your focus point or use the command dial to change the size.
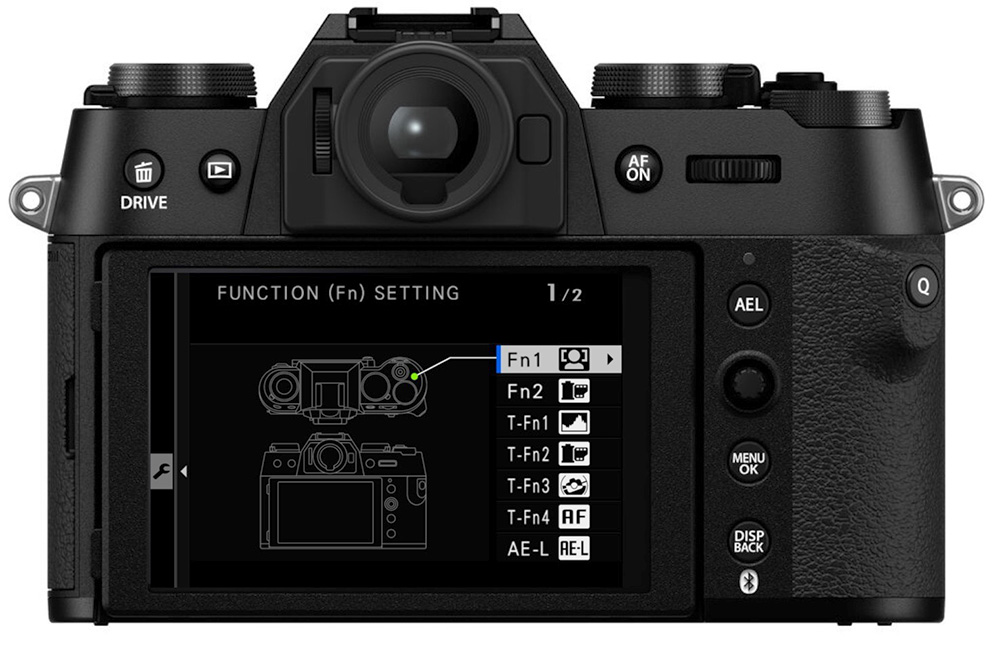
Function (Fn) Setting: Customize your camera controls to help you work more efficiently.
Shutter AF: AF-S On, AF-C On are the defaults – autofocus will start when you press the shutter halfway. Turn these off for the respective autofocus mode if you want to use back-button focus instead.
Shutter AE: On for either of these locks the exposure when the shutter is pressed halfway. Turn this Off for AF-C if you’re going to be tracking moving objects across changing lighting.
Shoot Without Lens: This needs to be On if you’re using a third-party lens or mount adapter.
Shoot Without Card: Off is a good extra notification that you don’t have a memory card installed, and shutter release is inhibited.
Lens Zoom/Focus Setting – Focus Ring Operation: Nonlinear gives you more precise focus control while focusing manually.
AE/AF Lock Mode: AE&AF On When Pressing is what I prefer so that exposure is only locked as I’m holding down the AE-L button when I need to use that.
AWB Lock Mode: I prefer AWB On as Switch so I can use auto white balance lock as an on-off switch.
Aperture Ring Setting (A): Auto gives you automatic aperture when the lens aperture control is set to A, which is nice to have at times. You can choose Command if you want to use the command dial for aperture control when the lens aperture is set to A.
Aperture Setting: Auto+Manual gives you the most versatility in lenses with no aperture control ring.
Power Management
Auto Power Off: 1, 2, or 5 Minutes. This puts the camera into standby mode after the set time. You can wake it by pushing the shutter halfway. This helps save your battery.
Performance: Normal is a good general setting to extend your battery; performance is still really good.
Save Data Setting
Frame No.: Continuous preserves the image numbering sequence when a new memory card is inserted. This helps with organization if you’re using multiple memory cards.
Copyright Info: I recommend adding Copyright and Author fields so this information is written to every image you create.
Geotagging: You can enable this if you’re using XApp and want to record the location of every image. Beware of how location data can be exploited by bad people; turn this Off if that’s a concern.
Network/USB Setting
Bluetooth/Smartphone Setting – Bluetooth On/Off: On is required if you want to use XApp for the features it can give you.
Bluetooth/Smartphone Setting – Auto Image Transfer Order: Off to disable automatic image transfer to your smartphone. The automatic transfer can really kill your battery and quickly fill up storage on your phone; it’s best to do this manually.
Bluetooth/Smartphone Setting – Smartphone Location Sync: On will download location data from your smartphone to your camera, but it won’t be recorded to the images unless Geotagging is turned On in the Save Data Setting menu.
Bluetooth/Smartphone Setting – Resize Image for Smartphone: On will downsize your pictures before sending them to your smartphone. I recommend this for most situations; this will speed up the transfers, and your camera will still have the full-size image. The downsized image will still be plenty big for social media.
Connection Mode: USB Card Reader to transfer images directly from your camera to your computer via a USB cable. The others are for using X RAW Studio and other special features.
USB Power Supply/Comm Setting: Auto allows simultaneous data transfer and charging through USB-C connections. Turn POWER SUPPLY OFF if you have data transfer issues when connected to a computer.
X-T50 Setup Final Thoughts
There is, of course, a lot more to the X-T50 than what we discussed here! I hope these recommendations get you set up to start creating images right away.
You can check out the X-T50 tutorial course to explore the camera more in-depth, learning about all of its functions and customizations. Enjoy!