Disclosure: This post may contain affiliate links. I earn a small commission of product sales to keep this website going.
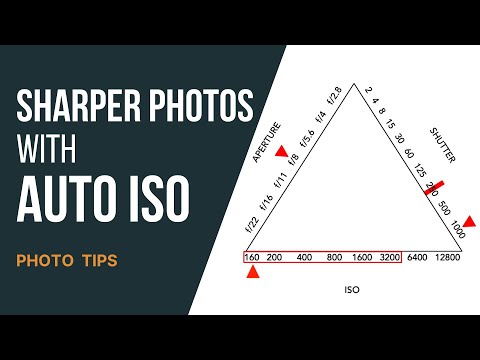
One of the biggest changes in my own photography came when I finally stopped treating ISO like it was still 2006.
Back then, shooting over ISO 400 meant ugly noise, so I did everything I could to avoid it. I slowed shutter speeds, tried to handhold too long, and ended up with more soft images than I care to admit.
Modern sensors are a different story. Even older Fujifilm bodies like the X-T2 and X-E3 can produce very usable images at ISO 6400, even 12800. On current cameras, it’s often a non-issue for most photographers.
And that’s exactly why you should be using Auto ISO.
Note: The “how-to” below is Fuji-specific, but the concepts apply to other brands too. Check your manual for details.
Here’s the video version if you’d rather watch this:
The Aperture Priority Problem
Aperture Priority is a popular way to shoot with Fujifilm cameras.
You:
- Set the aperture (for depth of field)
- Let the camera choose the shutter speed for correct exposure
Most photographers who “set ISO manually” leave ISO low for the cleanest image. That sounds logical, but it creates a big problem:
If the light gets low and you’re not paying attention, the camera might choose a shutter speed that is too slow to handhold or freeze your subject. The result is soft, blurry photos from motion or camera shake.
This is where Fujifilm’s Auto ISO saves the day.

What Auto ISO Does
Auto ISO lets the camera raise or lower ISO within a range that you set, so it can keep your shutter speed high enough to avoid blur.
This is the real power:
- You can set a minimum shutter speed
- The camera will raise ISO as needed to maintain that speed
- Only if it runs out of ISO will it allow the shutter to drop slower than your minimum
Think of it as Aperture Priority + safety net for shutter speed.
Most current Fujifilm X bodies let you store three different Auto ISO presets: AUTO1, AUTO2, and AUTO3.
How Auto ISO Works on Fujifilm
A quick note: if you’re using Dynamic Range (DR) settings like DR200 or DR400, the camera may use a higher minimum ISO than your programmed minimum. That changes the “low end” of your Auto ISO range. I have a separate article on that if you want the full explanation.
Case 1: ISO and Shutter both on “A” (Aperture Priority + Auto ISO)
With ISO on AUTO and the shutter dial set to A:
- The camera tries to use the lowest ISO in your chosen Auto ISO range.
- It then chooses a shutter speed that gives the correct exposure.
- If that shutter speed would be slower than your minimum:
- The camera starts raising ISO to keep shutter speed at or above your minimum.
- If it hits your maximum ISO and still needs more light:
- It finally allows the shutter speed to drop below your minimum.
Example:
- Auto ISO range: 160-3200
- Minimum shutter: 1/250 s
If the scene needs 1/125 s at ISO 3200 for correct exposure, the camera will: - Stay at ISO 3200
- Drop the shutter to 1/125 s to get the exposure right
You still get the shot, just at a slower speed than you requested because the camera ran out of ISO headroom.
Case 2: ISO on “AUTO,” shutter set to a specific speed
With ISO on AUTO but the shutter dial set to a specific speed (not A):
- The camera holds that shutter speed
- It adjusts ISO anywhere within your programmed range
- If it runs out of ISO and still needs more light, your image will be underexposed
This is powerful when you must have a certain shutter speed and are okay watching your exposure and histogram yourself.

When to Use Auto ISO
Personally, I use Auto ISO most of the time now.
I only go fully manual with ISO when I’m:
- Shooting long exposures
- Doing more deliberate “full control” work where I want to lock everything
For day-to-day photography, travel, people, and changing light, Auto ISO lets you worry less about settings and more about the scene. Don’t be afraid of higher ISO values – they can save your bacon.

How to Program Auto ISO on Fujifilm Cameras
Details vary slightly by camera, but the logic is the same.
You’ll tell the camera:
- Minimum ISO (usually 125 or 160 on modern bodies)
- Maximum ISO (where you personally start caring about noise)
- Minimum shutter speed (what you need to avoid blur)
You can also set min shutter to AUTO, which ties the minimum shutter speed to your focal length (the old “1/focal length” rule):
Auto minimum shutter speed (AUTO)
When you choose AUTO for minimum shutter speed:
- The camera picks a shutter speed around 1 / focal length
- Example: ~1/40 s with a 35mm lens
- With a zoom, it updates as you change focal length
This is great for:
- Still scenes
- Landscapes
- Static subjects
It’s not always enough to freeze people or fast movement, so keep that in mind.
Step 1: Decide What You Need From Auto ISO
Your settings should match your style. A landscape shooter will use Auto ISO differently from a street photographer.
Here is how I personally set it up after a lot of trial and error.
AUTO1 – General people/travel. My everyday setting:
- ISO: 125–6400
- Minimum shutter: 1/250 s
Why:
- 1/250 s is fast enough to freeze normal movement for people and everyday life
- I don’t mind some grain; sharp beats “clean but blurry” every time
- Works well for travel, portraits, street, documentary
AUTO2 – Landscapes and still subjects. For when I’m not worried about people moving:
- ISO: 125–1600
- Minimum shutter: AUTO
Why:
- AUTO minimum shutter based on focal length keeps camera shake under control
- ISO caps at 1600 for cleaner files
- Ideal for landscapes, architecture, still life, scenes where nothing is moving quickly
AUTO3 – “Emergency, I must get this shot”. Noise doesn’t matter. Sharpness does:
- ISO: 125–12800
- Minimum shutter: 1/125 s
Why:
- Gives the camera permission to push ISO very high
- 1/125 s is still usable for most situations if you are steady
- This is for those times when you’d rather have a noisy but sharp photo than nothing at all
Once you know how you want to use Auto ISO, it’s time to program it.
Step 2: Program Auto ISO in the Menu
Exact menu names vary, but the path is similar on most X bodies.
- Press MENU/OK
- Go to Shooting Setting
- Find ISO or ISO AUTO SETTING
- For AUTO1, AUTO2, AUTO3 set:
- Default (lowest) ISO
- Maximum ISO
- Minimum shutter speed (or AUTO)
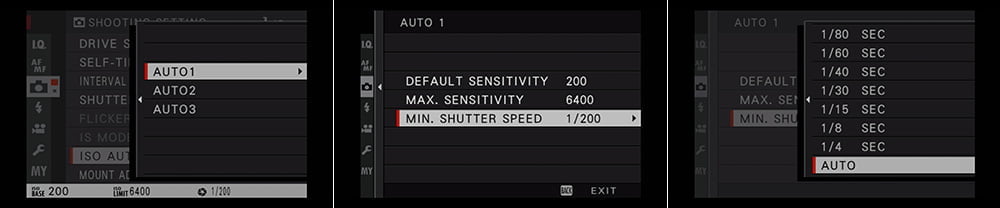
That’s it. The camera now “knows” how to behave in each Auto ISO mode.
If you’re programming AUTO ISO while in a Custom Setting (C1-C7), note that these programs aren’t “global”; they’re unique to that custom setting.
Step 3: Assign a Quick Way to Change Auto ISO
This is what makes Auto ISO truly useful: being able to switch quickly.
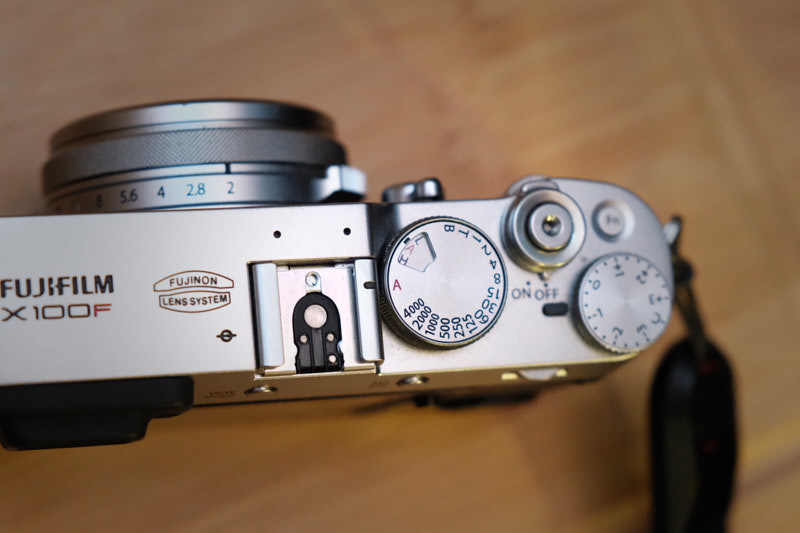
On older cameras (X-T2, X-E3, X100F), I used the front command dial:
- In Button/Dial Setting, set ISO DIAL SETTING (A) to COMMAND
- Rotating the front command dial lets you switch between AUTO1, AUTO2, AUTO3 on the fly
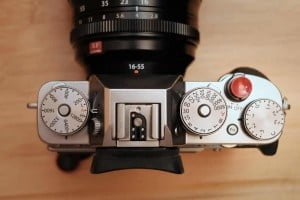
Newer cameras removed some of this behavior. I miss it. On newer bodies, I recommend:
- Assigning ISO AUTO SETTING (or ISO) to a custom button:
- Hold DISP/BACK
- Choose a button
- Assign ISO AUTO SETTING (or ISO)
- Or at least add ISO / Auto ISO to MY MENU so it’s one button away from MENU/OK
Overriding Auto ISO in a Pinch
Here’s one of the best parts of Fujifilm’s design.
You can:
- Leave ISO on AUTO,
- But quickly override shutter speed by turning the shutter dial.
Example:
- You’re walking around in Aperture Priority with AUTO1 (min shutter 1/250 s)
- Suddenly you want motion blur in a scene (say, people walking through a frame)
- Quickly twist the shutter dial to 1/30 or 1/60 s
- The camera keeps ISO in AUTO and adjusts ISO for proper exposure
Now you’re effectively in Manual exposure mode, but letting the camera worry only about ISO.
When you’re done:
- Turn the shutter dial back to A
- You’re right back to Aperture Priority with your programmed Auto ISO behavior
No menus. No scrolling. Just use the dials.

In the above example, I was in and out of buildings, shooting in AUTO ISO to maintain a fast enough shutter speed to freeze movement as I bounced between lighting situations.
But as I watched this scene, I wanted to show a subtle movement to put the viewer there. I quickly dropped my shutter dial to 1/60 and snapped this photo during the action.
Before going back outside, I put the shutter dial back in AUTO to give me the minimum of 1/250 that I had programmed for sharp images in the AUTO ISO menu. I was now back in Aperture priority and a pseudo-shutter priority with the Auto ISO.
The Last Step: Practice
The key to making Auto ISO work for you is familiarity.
- Practice switching between AUTO1, AUTO2, AUTO3 without thinking
- Learn which one you want for:
- People
- Landscapes
- “Emergency” moments
- Pay attention to how minimum shutter and max ISO choices behave in your real-world shooting
You don’t want to be shooting a landscape in AUTO2, then turn around for a quick portrait and realize you’re at 1/30 s when your subject moves. The goal is to build enough muscle memory that you switch modes instinctively.
Once you get comfortable with Auto ISO, your hit rate on sharp, correctly exposed images will go up, and you’ll spend less time fighting your camera and more time watching the scene.
If you want more help dialing this in on your specific Fujifilm body, my Fujifilm camera tutorial courses walk through setup, menus, and practical use step by step. You can use code “blog20” for 20% off.
How do you have Auto ISO set up on your Fuji?
Jay Nathanson
Saturday 11th of January 2025
I came across this article as I make my way through your very informative X-T5 tutorial course. Have your AUTO ISO settings changed as the Fuji camera sensors have improved? For example, would you use the same settings with the Fuji X-T5 or X100VI?
John Peltier
Sunday 12th of January 2025
I've kept them the same, I haven't noticed enough of an improvement to justify bumping them up a stop - I have them already kinda high to begin with.
David Kershberg
Friday 15th of September 2023
John, HELP! (please) I keep programming my three AutoIso settings in my x-T30, but when I do something else in the quick settings of the Custom Menu, the AutoIsos keep reverting back to the factory defaults. I’m obviously doing something wrong with these custom settings. Do you have a post covering this? Thank you! Dave
John Peltier
Friday 15th of September 2023
If I recall, and I'm reaching back, I had the same issue with my X-E3, which was in the same generation as the X-T30. The Auto ISO settings are saved to individual custom settings. It's super annoying, but try changing your Auto ISO settings how you wish, go to your Image Quality Menu > Edit/Save Custom Setting, and Save Current Settings. Or I think there's an "ISO" option in the Edit/Save Custom Setting menu, and if there is, you'll need to set all of them there for each custom setting.
Connor
Wednesday 8th of February 2023
Thank you for this! The question I have: If my Auto 2 ISO setting is: Def Sens = 160 Max Sens = 6400 Min Shutter Spd = AUTO
And the recipe I am using calls for : ISO: Auto, up to ISO 6400
Then using my AUto setting would cover this, and the camera will auto adjust the ISO based on my surroundings.
John Peltier
Wednesday 8th of February 2023
Yes, that's the gist of it. Just beware of your shutter speed going too low in dim light.
Michael
Sunday 27th of November 2022
I agree with all the article but I'd like to know how auto iso behaves when flash (built in or remote) is used
John Peltier
Sunday 27th of November 2022
The only difference is if you have a minimum shutter speed programmed that’s above the flash sync speed. The camera will max out at the flash sync speed, likely resulting in an overexposed photo, unless you have a flash you can force into high speed sync. Otherwise it just acts like any other automatic exposure variable while using flash.
Arie
Wednesday 10th of August 2022
Hi, i have a fujifilm X-S10 with 16/80 lens and i can't give the iso.What can i do? Thank you
John Peltier
Thursday 11th of August 2022
You can push the ISO button on top and change it in that menu