Disclosure: This post may contain affiliate links. I earn a small commission of product sales to keep this website going.
Perusing the Twitters the other day I saw Steve Brazill of Behind the Shot TV share the thoughts of another photographer, Adam Elmakias:
If you can’t see the embedded tweet above, it reads, “A lot of improvement as a photographer can be attributed to just *picking a better shot* from your shoot. The trick is learning what [the] hell a *better shot* is.”
This really resonated with me.
I spend a lot of time teaching my students the importance of editing. I have several articles on this site detailing the mechanics of editing, but none that really dive into why it’s so important to improve your editing skills.
So here are some thoughts on why getting good at editing photos is so important for photographers.
What’s the difference between Editing and Processing?
We of course need to start by addressing a common misconception: editing and processing are not the same things.
When someone says, I spent all day editing photos, a lot of the time what they mean is that they moved the sliders around in Lightroom all day long. This is not editing, this is processing.
Editing is the process of selecting which photos to process or include in your story. It’s a crucial step that all photographers should do before processing.
Do you edit?
If you captured 100 photos on a photo walk, you’re not going to process all 100, right? You’re not going to show all 100 to everyone, right? Of course not. You’re going to select the best 10 or so out of the 100 that really capture the essence of your photo walk.
I’m willing to bet that all photographers do this to some extent – discard the ones that are out of focus, process the money shots, and keep the rest. Even if you’re not aware of it, you’re editing here.
But how much thought do you give your editing process?
Is it as simple as getting rid of the out-of-focus photos, the over/under-exposed photos, and processing the ones you really like?
Editing should be much more involved than this. And if you put the effort into editing, you’ll come back with better photos.
How does Editing improve your photography?
Editing is important beyond the obvious reasons (or maybe not so obvious):
- You probably don’t have time to process all of the photos you captured on a shoot.
- Your clients probably don’t have the time to review all of the photos you captured on a shoot.
- Your audience certainly doesn’t have the time or attention span to really look at all of the photos you captured on a shoot.
- Including too many photos will dilute the impact of the good ones.
The last point is extremely important and not many photographers consider this. Imagine looking at a music album (if that’s still a thing) that has 30 shit songs and two really good songs. The whole album will suck and no one is going to want it, right? Same thing with a photo series or portfolio.
So those are the obvious reasons for editing, but how does editing improve your photography?
Technical skills
As you’re editing you might notice blurry photos. Don’t worry, it happens to all of us, even me 🙂
Why are they blurry? Is it because of your focus technique? Or was your shutter speed too slow? Should you have been using a tripod?
Pay attention to this when you see it during editing. Make mental notes for the next time you’re out with your camera. 1/60th sec was too slow for this subject – go faster. Make sure that focus point is over my subject when the aperture is that large. And so on.
Are your photos constantly overexposed or underexposed? Note this so you pay more attention to your exposure.
Next time you’re out on a shoot and come back to edit your photos, you’ll notice more keepers as your technical skills improve. All thanks to noticing where and how they could improve while you’re editing.
Creative skills
Why are you drawn to picking certain photos over others while editing? Which visual aesthetics are in those photos? If you can identify these, you’ll look for them more while you’re out photographing:
- Use of color
- Geometry
- Light & shadow
- Layering
- Inclusion/exclusion of elements
- Moment/gesture
- Emotion
Hundreds of books have been written on these topics so I don’t dare go down that rabbit hole in this article. But look for these things while you’re editing.
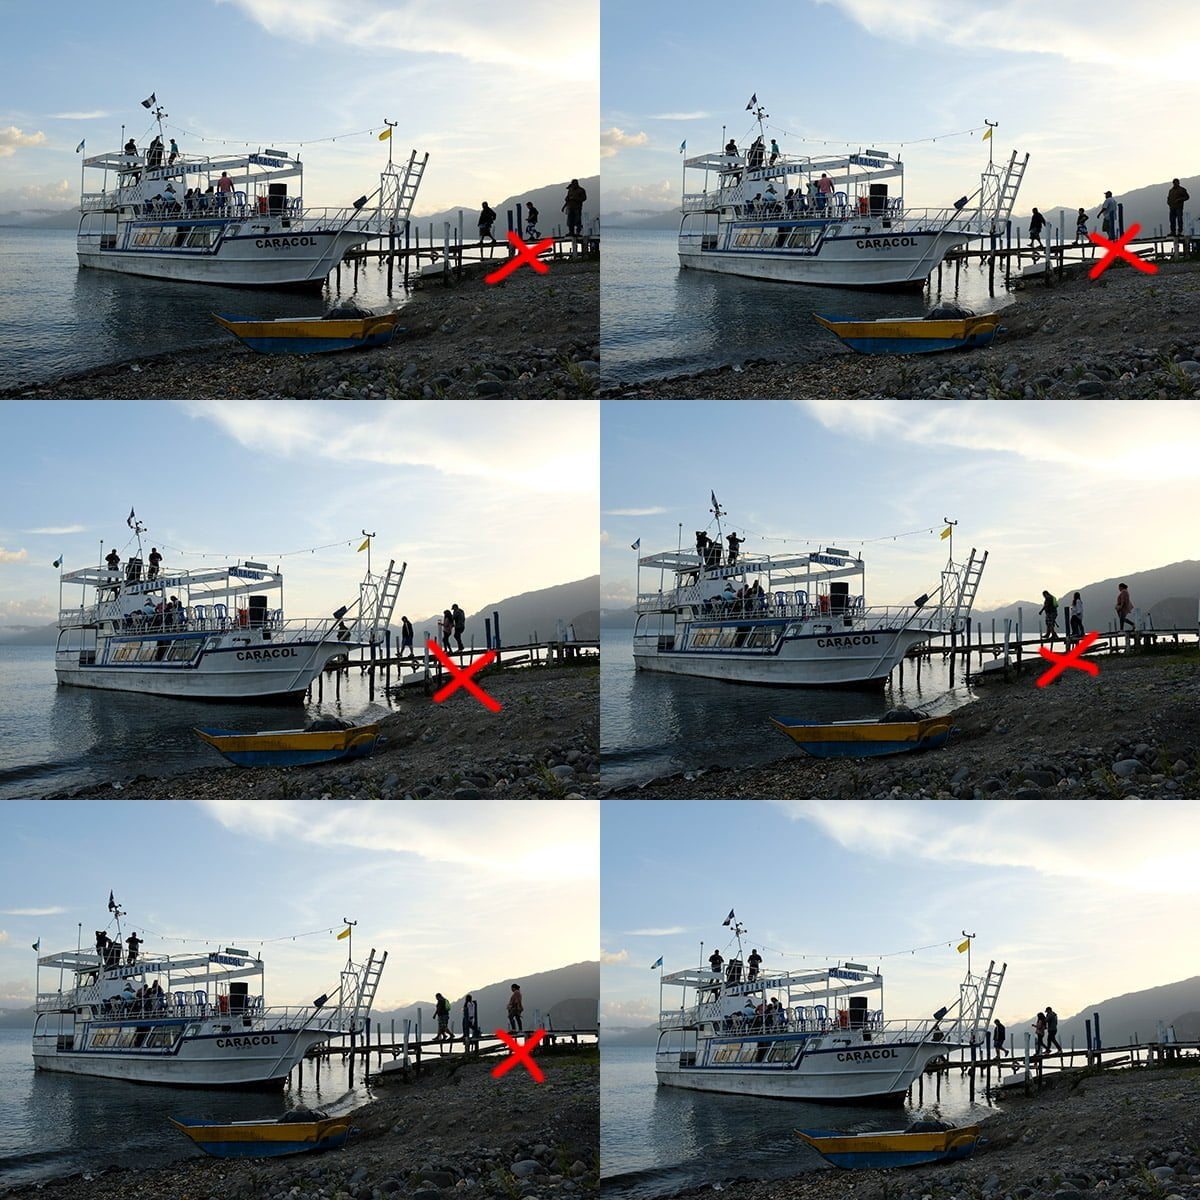
As an example, here’s a series of photos I created of people walking down a dock. They’re all very similar. But in the end, I chose the one where the people mostly have a natural stride. They don’t have that awkward mid-step goofiness where they appear to have only one leg or they’re doing some kind of weird yoga posture.
If you’ve never paid attention to anything like this while you’re photographing, but you notice it while you’re editing, it’ll be a lightbulb moment for you. Ah, I need to be more careful with my timing and/or get multiple photos when people are walking so I have choices!

Storytelling skills
Picking the “best” photos isn’t just about picking the ones that you like.
It’s about picking the ones that will tell the story, even if those photos aren’t five-star photos on their own.
As you learn to edit photos for storytelling, you’ll start to think that way when you’re out with your camera. You’ll start to look for those types of photos that, during editing, you noticed help tell stronger stories.
The basic storytelling photos are:
- The “opening”/establishing photo
- The detail/closeup photos
- The moments & gestures
- The “closing” photo
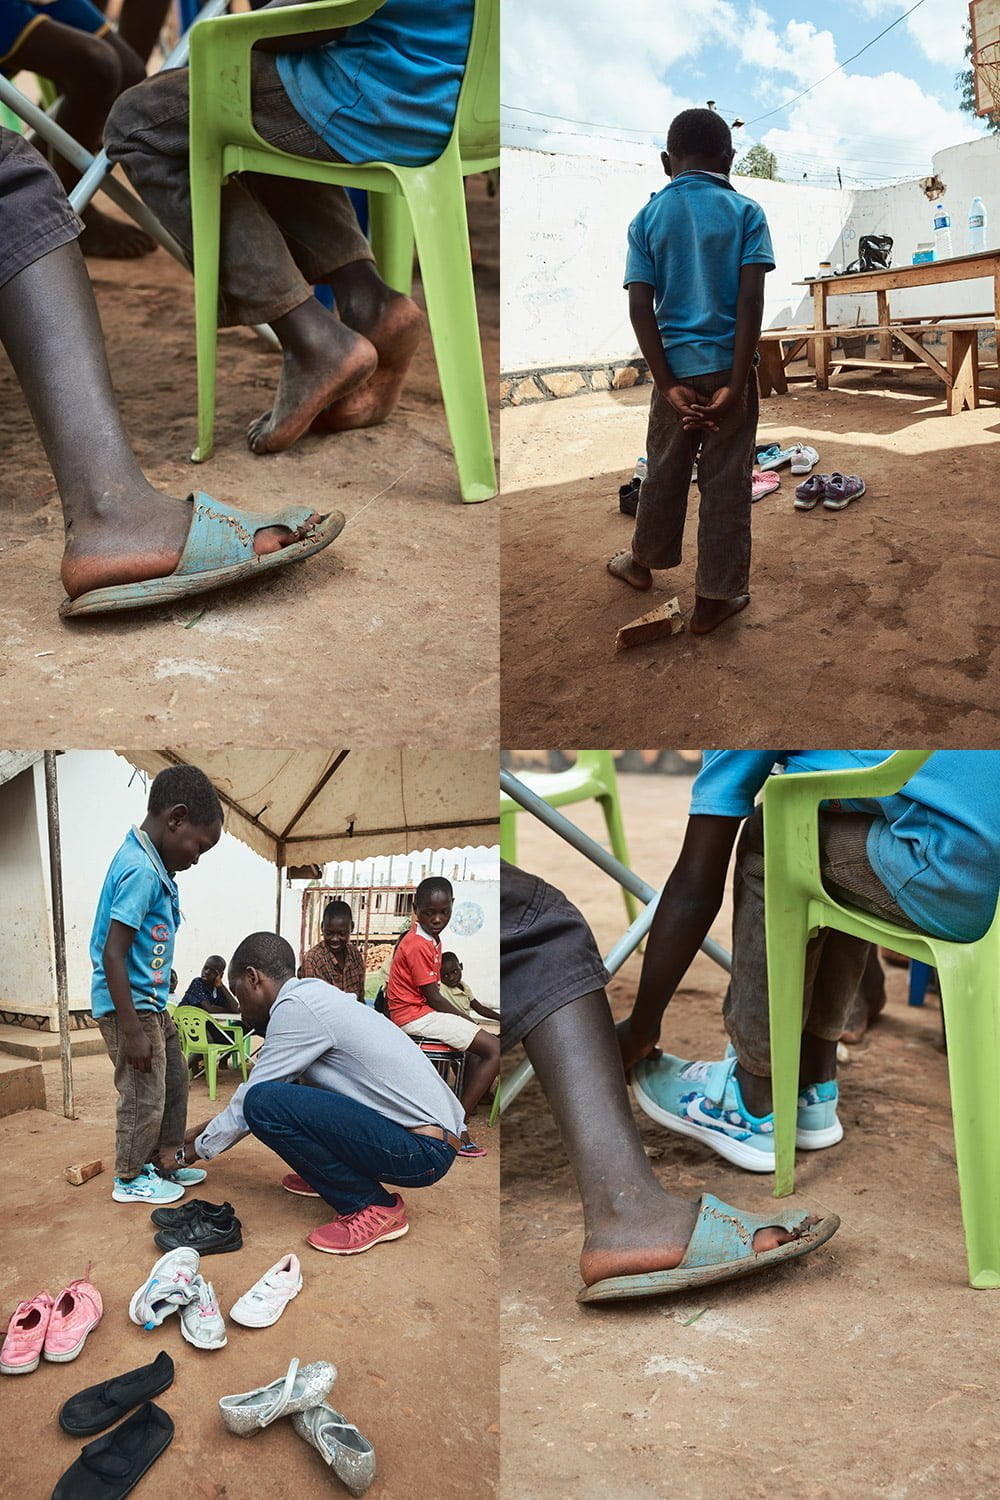
Look at the example below. On their own, these photos aren’t necessarily strong photos. I certainly wouldn’t put them on the ‘gram by themselves. But together they help tell the story of a boy with no shoes finally getting some new kicks. This is editing for story.

Not all photos will be part of a story, for sure. But if you’re photographing for any kind of narrative, paying attention to storytelling photos while you’re editing will help you capture stronger storytelling photos while you have camera in-hand.
Final thoughts
Great, that’s why editing is important, but how do I actually use a program to do that?
Good question. I have a few articles on that, and while they’re specific to certain apps & programs, the big-picture approach can be applied to any app or program that allows you to select or rate photos.
There are so many things we can do to improve our photography. Often we get bogged down in the gear choices and post-processing techniques.
But when was the last time you really paid attention to how and why you edit? How will doing so make you a better photographer?
This isn’t about getting 100% keepers every time you go out with your camera. It’s about coming back with less chaff and stronger photos to choose from.
Did I miss any reasons on how editing can improve your photography? Please leave them below!

Zubida
Thursday 15th of April 2021
Thanks for making a big difference between photo processing and photo editing that makes a lot of confusion among the people. Photo editing is a dynamic job that requires excellent visual, communication, and organizational skills, as well as strong adherence to deadlines.
Job de Lange
Tuesday 6th of April 2021
Interesting article! Well explained, and useful, as always. Thanks John!
John Peltier
Tuesday 6th of April 2021
You're welcome Job, thanks for the feedback.
Barbara Lewis
Wednesday 31st of March 2021
Thanks for distinguishing between editing and processing and what can be learned from "editing". This is an important distinction I haven't made before and a helpful discussion of what we can learn.
FYI: I would love an article that clearly lists and explains the camera's menu system in terms of which settings are needed with recommendations and which can be ignored when shooting only in RAW. It would be wonderful to have this list and understanding camera specific. For me that would be the XT-3.
John Peltier
Wednesday 31st of March 2021
Thanks for the request, I'll add that to my list of future articles to publish, though it may be a while. But for now, if you don't care about the JPEGs at all and just want to know what your RAW files will look like, you can ignore everything in the IMAGE QUALITY SETTING menu between Film Simulation and Noise Reduction. You should be good keeping your White Balance in AUTO. Set your IMAGE QUALITY to RAW and RAW RECORDING is, for 99.9% of us, good at COMPRESSED. Then (most importantly) go into your SET UP menu, to SCREEN SET UP, then turn NATURAL LIVE VIEW on. This will give you a natural, flat, RAW-looking image preview when you're photographing.